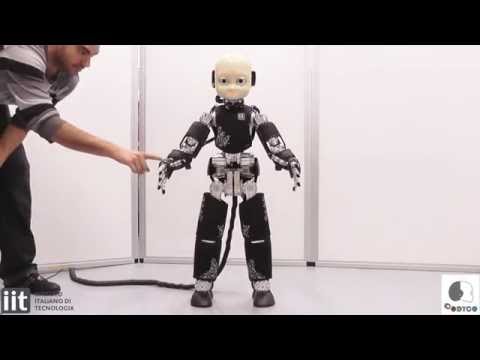
This document contains basic instructions on how to install this toolbox, tips and tricks to do so and a walkthrough to get you started using it. Simulink blocks consist of S-functions (http://goo.gl/1GuHVd) which allow C/C++ user specific code compiled as Matlab Executable (MEX) files, thus extending the capabilities of the Simulink environment. In other words, MEX files have been created linking YARP, iCub, iDynTree (a more efficient and generic YARP-based robot dynamics library than its predecessor iDyn - http://goo.gl/BnGzKr) and CoDyCo, wrapping the Whole Body Interface described in http://goo.gl/dBWO3k. The following video shows CoDyCo's 1st year results on iCub in which the top level controller has been implemented with the WBI-Toolbox and runs at a 10ms rate!
The library should allow non-programming experts or those researchers just getting acquainted with Whole Body Control to more easily deploy controllers either on simulation or a real YARP-based robotic platform, as well as to analyze their performance and take advantage of the innumerable MATLAB and Simulink toolboxes. We like to call it "rapid controller prototyping" after which a proper YARP module should be made for hard real time performance and final deployment.
- Matlab V. 7.1+ and Simulink (Tested with Matlab R2014a, R2013a, R2012a/b, R2011a)
- Simulink Toolboxes: Simulink Coder.
- YARP (https://github.com/robotology/yarp) -IMPORTANT- Please compile as shared library. Currently a default yarp configuration option.
- CoDyCo (https://github.com/robotology-playground/codyco-superbuild)
- iCub (https://github.com/robotology/icub-main)
- Gazebo Simulator (http://gazebosim.org/)
- gazebo_yarp_plugins (https://github.com/robotology/gazebo_yarp_plugins).
Operating Systems supported: Linux, MAC OS X, Windows.
Note: The following instructions are for Linux distributions, but it works similarly on the other operating systems.
The WBI-Toolbox can be compiled through the CoDyCo project (https://github.com/robotology-playground/codyco-superbuild). This is the easiest and recommended way to do so. In the following steps assume that $CODYCO_SUPERBUILD_DIR points to the /build directory of your CoDyCo installation and $CODYCO_SUPERBUILD_ROOT to the corresponding root directory of your installation. In case you are using the simulator, make sure that the iCub models are being loaded and the gazebo_yarp_plugins properly working. This is easy to verify as you need only to launch a yarpserver followed by Gazebo and load the desired model, be it iCub (fixed) or iCub. If the robot does not fall under the effect of gravity, it means the plugins are working and you can go ahead with the installation of the Toolbox.
-
Check the matlab configuration. Before going ahead with the compilation of the library, make sure that you have MATLAB and Simulink properly installed and running. Then, check that the MEX compiler for MATLAB is setup and working. For this you can try compiling some of the MATLAB C code examples as described in [http://www.mathworks.com/help/matlab/ref/mex.html#btz1tb5-12].
-
Compiling the WBI Toolbox. To compile the WBI Toolbox via
codyco-superbuild, you first need to configure the latter with CMake. A few flags need to be taken into account in order to do this. In particular if you want to use iCub on the Gazebo simulator please do:
   cd $CODYCO_SUPERBUILD_DIR
   cmake ../ -DCODYCO_USES_WBI_TOOLBOX:BOOL=YES -DCODYCO_USES_URDFDOM:BOOL=YES -DICUBWBI_USE_EXTERNAL_TORQUE_CONTROL:BOOL=NO
When using the real robot set the flag -DICUBWBI_USE_EXTERNAL_TORQUE_CONTROL:BOOL=YES. Then as usual type c to configure until no stars (*) show up and g to generate. Finally, to compile type make.
After this step all the subprojects will be installed inside the build/install directory. In order to use use it you will have to adjust some environment variables in your ~/.bashrc
export PATH=$PATH:${PROJECT_SOURCE_DIR}/build/install/bin/
export LD_LIBRARY_PATH=$LD_LIBRARY_PATH:${PROJECT_SOURCE_DIR}/build/install/lib/
Note: For more information on how to compile or update codyco-superbuild go to http://goo.gl/aU6EjH
- Installation. There are a number of ways to install the Toolbox. They all consist in ensuring that the MEX files you just compiled are found in MATLAB's path, along with the Toolbox itself and its icons. We try to make your life easier and prepared an installation script that can be found under the name
startup_wbitoolbox.min${CODYCO_SUPERBUILD_ROOT}/codyco/WBIToolboxwhich automatically takes into account where you installed the WBIToolbox as specified by the variableCMAKE_INSTALL_PREFIX. You can see the default value of this variable by going to${CODYCO_SUPERBUILD_DIR}/codyco/WBIToolboxand typingccmake ./to see the CMake default options for the Toolbox. In this way after compilation, runningstartup_wbitoolbox.mshould automatically add the desired directories to MATLAB's path. It will also give you further instructions if you desire to permanently install it as to not run the script every time you want to use the Toolbox.
If for some reason the installation fails or you want to do this manually, the directories you need to add to the path are ${CODYCO_SUPERBUILD_DIR}/install/mex (assuming the default CMake installation directory) and that for the controllers, models and Toolbox itself, i.e. ${CODYCO_SUPERBUILD_ROOT}/codyco/WBIToolbox/controllers by doing
    addpath([getenv(CODYCO_SUPERBUILD_DIR)  /install/mex])
    addpath([getenv(CODYCO_SUPERBUILD_ROOT) /codyco/WBIToolbox/controllers])
You can also create a .m file with these two lines and launch MATLAB from terminal as:
matlab -r yourStartupFileWBI-Toolbox is discrete in principle and your simulation should be discrete as well. By going to Simulation > Configuration Parameters > Solver you should change the solver options to Fixed Step and use a discrete (no continuous states) solver.
-
Test the Library. In
$CODYCO_SUPERBUILD_ROOT/src/simulink/controllersyou can find some models for testing (more on this in the README of the aforementioned directory). In order to test that the library is working correctly and properly linking YARP you can try launching ayarpserver, after which you can go to the controllers directory in MATLAB and open yarpwrite.mdl. Before starting the simulation, give a name to the YARP port where you want to write by double clicking the block and editing the mask that pops up. -
For MAC OS X Users. It has been reported that on MAC OS you need to define the place where you want MATLAB to find at runtime dynamic libraries for YARP, in case you have compiled YARP in a directory different from the default one. This can be added in
${MATLAB_ROOT}/bin/.matlab7rc.shby first doing
chmod +w .matlab7rc.shThen looking for the variable LDPATH_SUFFIX and assign to it the contents of your DYLD_LIBRARY_PATH. Finally do:
chmod -w .matlab7rc.sh- Additional notes. In case Matlab has trouble finding a specific library, a workaround is to launch it preloading the variable
LD_PRELOAD(orDYLD_INSERT_LIBRARIESon Mac OS X) with the location of the missing library. On Linux you might also have trouble with libstdc++.so since Matlab comes with its own. To use your system's libstdc++ you would need to launch Matlab as:
LD_PRELOAD=/usr/lib/x86_64-linux-gnu/libstdc++.so.6.0.19 matlab
You could additionally create an alias to launch Matlab this way.
Internally, the toolbox uses YARP's ResourceFinder (http://goo.gl/4zAS6r). When you compile the WBI-Toolbox, default .ini files will be generated for iCubGenova01, iCubGenova03 and icubGazeboSim. These .ini files can be found in ${CODYCO_SUPERBUILD_ROOT}/codyco/WBIToolbox/libraries/wbInterface/conf/wbit and contain the following parameters later used by the underlying Whole Body Interface:
- robot: robot name (i.e. icubGazeboSim, iCubGenova01, etc).
- local: prefix of the YARP ports that the WBI will open.
- headV: [int] head version of your robot.
- legsV: [int] legs version of your robot.
- feetFT: [bool] Is the robot endowed with force/torque sensors for its feet?
- uses_urdf: [bool] Is your robot fixed to root or standing on the floor? (for icubGazeboSim this would mean whether you are using the
iCub (fixed)oriCubmodels) - urdf: location of the urdf model of the robot to be used.
If you wish to change any of the default values you should do it in ${CODYCO_SUPERBUILD_ROOT}/codyco/build/install/share/codyco/contexts/wbit/ (assuming you left the default installation directory of the WBI Toolbox, otherwise look for the corresponding contexts directory). To generate default .ini files for a different robot, head to ${CODYCO_SUPERBUILD_ROOT}/codyco/WBIToolbox/libraries/wbInterface/conf/wbit/CMakeTmp and add your new .ini.in file.
What's important to remember is that your YARP_DATA_DIRS environmental variable should include your CoDyCo /share directory where CoDyCo contexts can be found. If you locally installed CoDyCo, it should be enough to append the following location:
$CODYCO_SUPERBUILD_DIR/install/share/codyco to YARP_DATA_DIRS.
Our most recent controllers and other Simulink diagrams can be found in ${CODYCO_SUPERBUILD_ROOT}/codyco/WBIToolbox/controllers. In there you can find:
-
torqueBalancing/controllerWithHandControl.slx This is the latest iCub's COM controller. The one used for the video in the beginning of this document.
-
wholeBodyImpedance/impedanceControl.mdl This is a whole body impedance controller which sets all joints in impedance where the equilibrium pose is the initial one before running the controller. You can additionally perturb the system applying external wrenches on the robot links. Go to a terminal and enter
yarp rpc /icubGazeboSim/applyExternalWrench/rpc:ithen typehelpfor additional information on how to apply wrenches on the robot and thus test its compliant behavior.
Linux, Windows, MAC OS X