-
Notifications
You must be signed in to change notification settings - Fork 6
Waltz Workshop@ESRF_development
This is a continuation for Waltz workshop@ESRF
- Install Tango Controls
- Install Tango REST server
- Setup your IDE
In this section we will, first, develop a new widget (Dashboard) and integrate it into Waltz. Next, we will create a small custom application with this dashboard.
-
Create new .js file in resources/webix_widgets and name it my_dashboard.js
-
Copy'n'Paste the following code into the newly created file:
/**
 * @module MyDashboard
 */
(function(){
    //this function is private to this module
    var newPlotWidget=function(){
        return {
            gravity: 3,
            template: "template"
        }
    };

    /**
     * @type {webix.protoUI}
     */
    var my_dashboard = webix.protoUI(
        {
            name: 'my_dashboard',
            /**
             * @return {webix.ui}
             * @private
             */
            _ui:function(){
                return {
                    rows:[
                        {},
                        {
                            gravity: 3,
                            cols:[
                                {},
                                //call of the functuon. It is a good idea to move parts of the UI to a dedicated functions
                                newPlotWidget(),
                                {}
                            ]
                        },
                        {}
                    ]
                }
            },
            /**
             *
             * @param config
             * @constructor
             */
            $init:function(config){
                //extend client config with this widget's ui
                webix.extend(config, this._ui());
                //add some after construction logic
                this.$ready.push(function(){
                    webix.message("My dashboard has been initialized!")
                }.bind(this));//very important to bind function to a proper this object
            }
        }
    // webix.IdSpace is required to isolate ids within this component
    , webix.IdSpace, webix.ui.layout);//this component extends webix layout -- an empty view

    //this function will be available globally i.e. exports our dashboard
    newMyDashboard = function(config){
        return webix.extend({
            view: 'my_dashboard'
        }, config);
    }
})();
Here we have created a webix.protoUI my_dashboard -- a stub for a smart component of our new dashboard that extends webix layout. We also extends its functionality injecting webix.IdSpace mixin.
READ MORE:
[1] webix.protoUI
[2] webix.ui.layout
[3] webix mixins -- building blocks for existing and new components
[4] webix.IdSpace
- Next, we need to register our new dashboard among other platform widgets. For this open setup.js in resources/webix_widgets and add
'my_dashboard'to the array of webix files:
//file: resources/webix_widgets/setup.js

TangoWebappPlatform.ui = {
    _webix_files: [
        //...
        "attrs_monitor_view","device_monitor_view","scripting_console",
        "my_dashboard" //<!-- add this
    ]
};
This array is a list of widgets that are used in the application.
setup.js is required due to limitation of Nashorn (see upcoming presentation)
- Finally, lets add our dashboard to Waltz. Open main_controller.js in controllers/tango_webapp. And edit its buildUI function:
//file: controllers/tango_webapp/main_controller.js

    buildUI: function (platform_api) {
            //...

            ui_builder.set_right_item(TangoWebapp.ui.newDeviceControlPanel(platform_api.context));
            //add this to buildUI function -->
            ui_builder.add_mainview_item(
                {
                    header: "<span class='webix_icon fa-dashboard'></span> My Dashboard",
                    borderless: true,
                    body: newMyDashboard({id: 'my_dashboard'})
                });
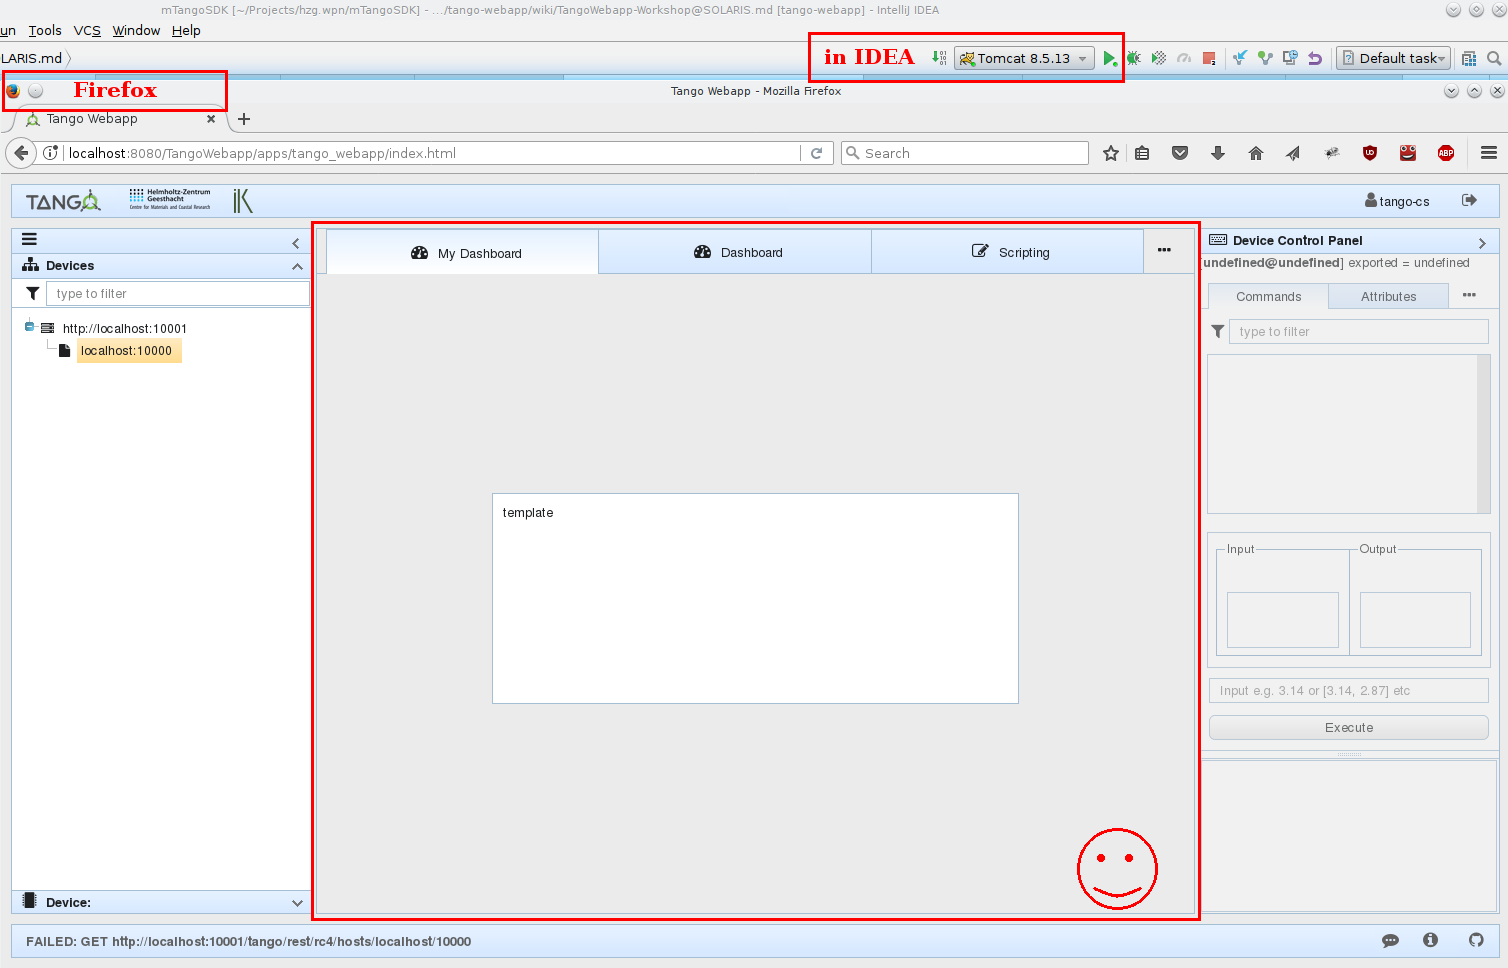
//<--- Run Tomcat in IntelliJ IDEA (if not yet started and be sure REST is started) and check the result:

IMPORTANT: run Tomcat from IntelliJ IDEA, NOT from Terminal. Otherwise Tomcat won't update sources and may not deploy proper application at all.
- Replace newPlotWidget function from the previous part with the following:
    //file: resources/webix_widgets/my_dashboard.js

    //this function is private to this module
    var newPlotWidget=function(){
        return TangoWebapp.ui.newImageView({
            id:'mydashboard.plot',
            gravity: 3
        });
    };
Here we use existing ImageView from Waltz platform. In the next step we will add data to it.
- Let's update our PlotWidget every second.
NOTE Change localhost to what you have in Waltz if your Tango Host name differs.
NOTE Be sure your sys/tg_test/1 device is exported. If not, execute /usr/lib/tango/TangoTest test in Terminal where your Tango Controls locates.
Add this code to $ready.push(function(){...}) in my_dashboard.js.
    //file: resources/webix_widgets/my_dashboard.js#$init#this.$ready

    //store our plot widget reference for later use
    var plot = $$(this).$$('mydashboard.plot');
    //store attr promise for later use
    var attr = PlatformContext.rest.fetchHost('localhost:10000')
        .then(function(host){
            return host.fetchDevice('sys/tg_test/1');
        }).then(function (device) {
            return device.fetchAttr('double_image_ro')
        });
    //builtin JS function. It will execute attr.read every 1000 ms
    setInterval(function(){
        attr.then(function(attr){
                return attr.read();
            })
            .then(function(value){
                plot.update(value);
            })
            .fail(function(err){
                TangoWebappHelpers.error("Could not read attribute", err);
            });
    }.bind(this),1000);
Read more
[1] webix.promise
- Check the result. Switch to Firefox and refresh the page (
F5):

- Use Runnable mixin to perform the routine. Mixin - a block of code that lets us group declarations we may reuse.
Inject TangoWebappPlatform.mixin.Runnable into my_dashboard view:
    //file: resources/webix_widgets/my_dashboard.js#my_dashboard

    //code line # ~76
, TangoWebappPlatform.mixin.Runnable, webix.IdSpace, webix.ui.layout);//<-- add TangoWebappPlatform.mixin.Runnable- Insert run method before
$init:function(config){...}.
    //NEW CODE HERE!!!
    run:function(){
        var $$plot = $$(this).$$('mydashboard.plot');
        //note this.
        this.attr.then(function(attr){
                return attr.read();
            })
            .then(function(value){
                $$plot.update(value)
            })
            .fail(function(err){
                TangoWebappHelpers.error("Could not read attribute", err);
            })
    },
    /**
     *
     * @param config
     * @constructor
     */
    $init:function(config){
And we change the body of the this.$ready.push function.
Replace the this.$ready.push with following:
        this.$ready.push(function(){
            //NOW STORE attr AS PROPERTY
            this.attr = PlatformContext.rest.fetchHost('localhost:10000')
                .then(function(host){
                    return host.fetchDevice('sys/tg_test/1');
                }).then(function (device) {
                    return device.fetchAttr('double_image_ro')
                });
            //start the routine
            this.start();//this function is defined in Runnable mixin
        }.bind(this));//very important to bind function to a proper this object
NOTE here we delete setInterval in $ready function and add run method:
Usage of TangoWebappPlatform.mixin.Runnable will handle a number of situations for you. Like suspending the routine when the widget is not visible. To check this lets use Firefox dev tools:
- Switch to Firefox and refresh the page (
F5). Now open dev tools (F12) and switch to the Network tab:

You will notice a bunch of requests every second. If you switch to Settings tab requests will cease to appear. This is because TangoWebappPlatform.mixin.Runnable implements this functionality.
And of course it is a good practice to extract common functionality and re-use it. You can define your own mixins!!!
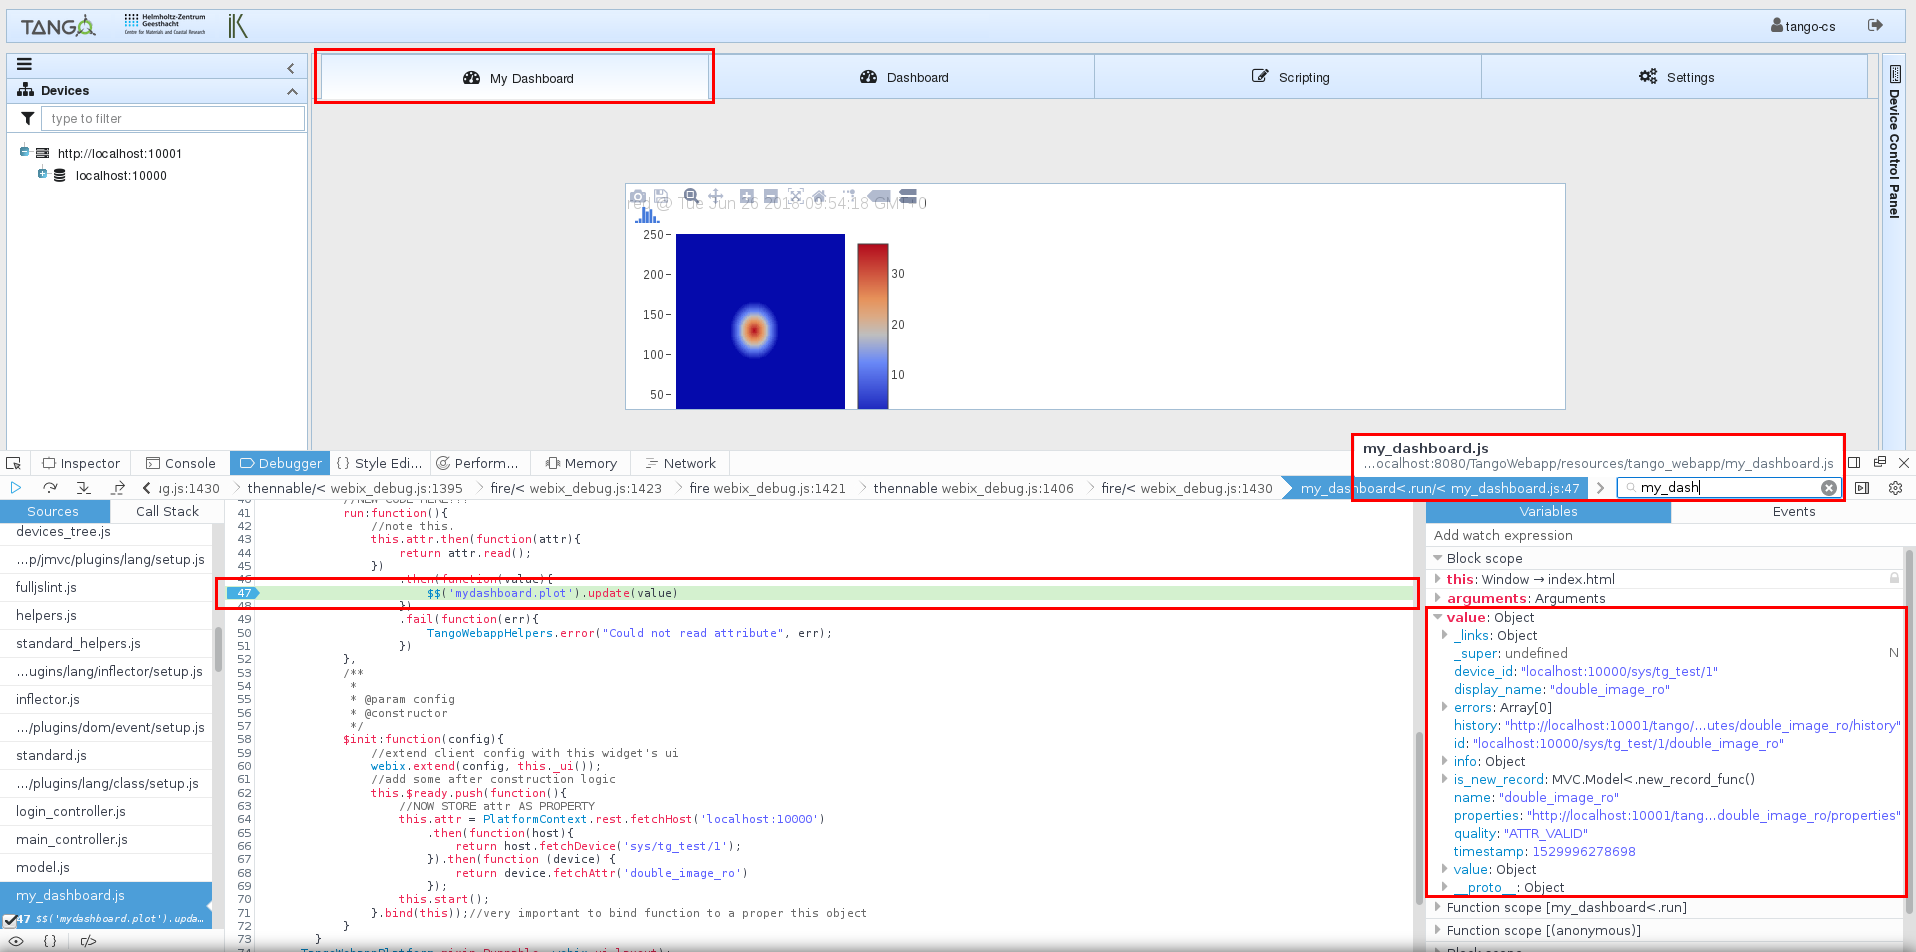
- Using dev tools debugger. Very important feature and skill - to debug the code. Lets have a look what we get from the server when reading our attribute. Switch to Debugger tab look for my_dashboard.js, put a break point and switch back to My Dashboard tab in Waltz:

- First generate a new test stub in your project root:
$>  ./jmvcc jmvc/generate/test functional test_my_dashboard
Generating ... test/functional/test_my_dashboard_test.js

              Done!


              Make sure to add to your application files!

$>
This command will add a new file in test/functional folder. Alter its content as follows:
new Test.Functional('test_my_dashboard',{
   test_truth: function() {
       var dashboard = newMyDashboard({id:'my_dashboard_test'});
       webix.ui({
           view: 'window',
           close: true,
           width: 800,
           height:600,
           body: dashboard
       }).show();

       this.assert(true);
   }
});
In this test we will simply open a new webix window with our dashboard.
Now we need to enable this test and run the application in test mode:
Read more
[1] webix.window
- Add
'test_my_dashboard'line into apps/tango_webapp/test.js
//file: apps/tango_webapp/test.js

include.functional_tests(
    //...
    'tango_webapp/attrs_monitor_view',
    'test_my_dashboard' //<!--
);- Enable test mode in apps/tango_webapp/index.html:
<!-- file: apps/tango_webapp/index.html-->

<!--<script type="text/javascript" src="../../jmvc/include.js?tango_webapp,development"></script>-->
<script type="text/javascript" src="../../jmvc/include.js?tango_webapp,test"></script> <!-- replace development with test -->- Switch to Firefox and refresh the page (
F5). A test console will popup. Wait until all tests are loaded, switch to Functional tab, scroll to my_dashboard test and run it:

The final version of the code for this exercise is available here
- Create new jmvc app in the project root:
$> ./jmvcc jmvc/generate/app my_app
               apps/my_app
Generating ... apps/my_app/compress.js
               apps/my_app/index.html
               apps/my_app/run_unit.js
               apps/my_app/test.js
               apps/my_app.js
               controllers/my_app/main_controller.js

Make sure to add new files to your application and test file!
$>
- Set up dependencies. Add
include('platform')and webix widgets to apps/my_app.js :
//file: apps/my_app.js

include('platform')

//...
include(function(){
    //...
    //webix widgets
    include.resources(
        "webix_widgets/setup"
    );
});- Enable plotly library as it is required for plots. Uncomment plotly in index.html:
<!--file: apps/my_app/index.html -->

<!--<script type="text/javascript" src="https://cdn.plot.ly/plotly-latest.js"></script>-->
<!-- uncomment plotly -->
<script type="text/javascript" src="https://cdn.plot.ly/plotly-latest.js"></script>- Replace main_controller.js#load function with buildUI in controllers/my_app/main_controller.js:
//file: controllers/my_app/main_controller.js

//replace load function
buildUI: function(platform){
    var ui_builder = platform.ui_builder;

    ui_builder.add_mainview_item({
        header: "<span class='webix_icon fa-dashboard'></span> My Dashboard",
        borderless: true,
        body: newMyDashboard({id: 'my_dashboard'})
    });
}- Check the result. Switch to Firefox and navigate to
http://localhost:8080/WaltzDev/apps/my_app/index.html
NOTE my_app in the link

Packaging. Create assemble script in the project root folder:
var buildDir = "build/work";
$EXEC("ant -f jmvc/ant/build.xml build -Dapp=platform -DbuildDir=${buildDir}")
echo($OUT)
echo($ERR)
if($EXIT !== 0) exit($EXIT)

$EXEC("ant -f jmvc/ant/build.xml build -Dapp=my_app -DbuildDir=${buildDir}")
echo($OUT)
echo($ERR)
if($EXIT !== 0) exit($EXIT)

$EXEC("ant -f jmvc/ant/build.xml compress-and-move -Dapp=my_app -DbuildDir=${buildDir}")
echo($OUT)
echo($ERR)
if($EXIT !== 0) exit($EXIT)

$EXEC("ant -f jmvc/ant/build.xml copy-webapp -DbuildDir=${buildDir}")
echo($OUT)
echo($ERR)
if($EXIT !== 0) exit($EXIT)

$EXEC("ant -f jmvc/ant/build.xml war -DbuildDir=${buildDir}")
echo($OUT)
echo($ERR)
if($EXIT !== 0) exit($EXIT)
And run it: $> ./jmvcc assemble
The following output indicates successful execution:
...
war:
      [zip] Building zip: /storage/Projects/hzg.wpn/mTangoSDK/tango-webapp/build/distributions/TangoWebapp.war

BUILD SUCCESSFUL
Total time: 0 seconds
$>
build/distributions/TangoWebapp.war file can now be deployed to tomcat. But it is a good idea to automatize this process. See next section.
- Move assemble script to jmvc/ folder. Now Travis will automatically build my_app every time new code is pushed to GitHub.
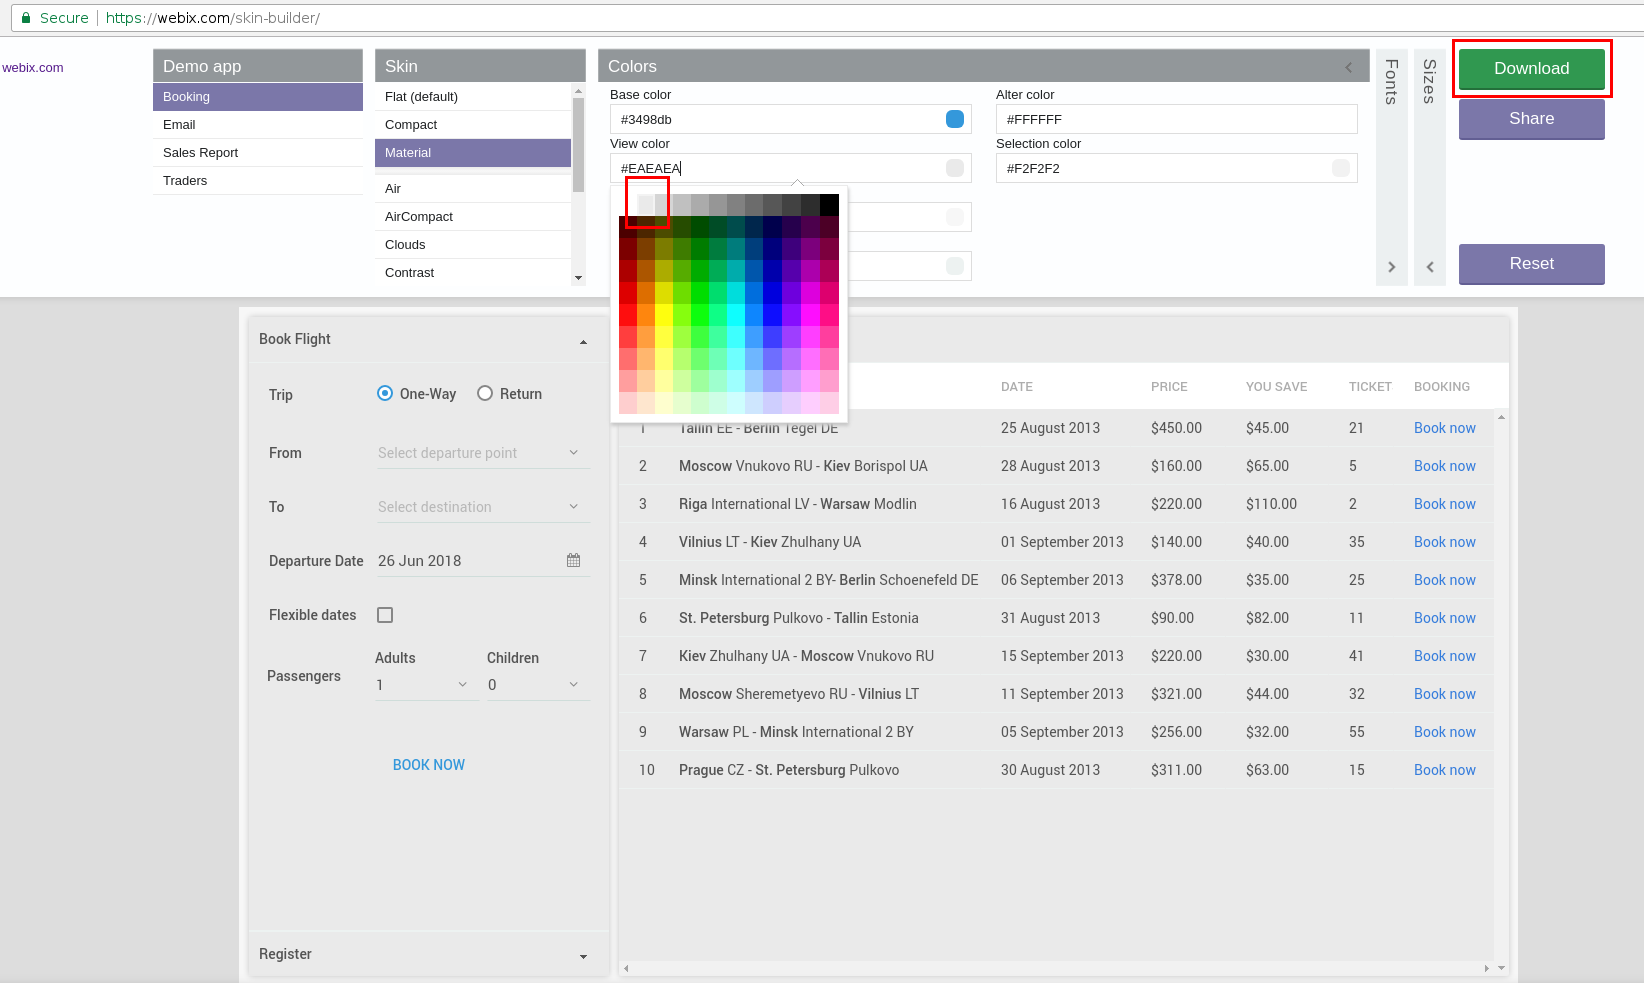
- Go to the webix skin builder link:

- Play with different style themes. We will choose material and adjust background color/view color and download the resulting theme:

- Unpack downloaded archive into stylesheets folder and enable the new skin in index.html (apps/my_app folder) adding:
<!-- file: apps/my_app/index.html -->

<!--<link rel="stylesheet" href="https://cdn.webix.com/5.2/skins/aircompact.css" type="text/css">-->
<link rel="stylesheet" href="https://cdnjs.cloudflare.com/ajax/libs/font-awesome/4.7.0/css/font-awesome.min.css">
<link rel="stylesheet" href="../../stylesheets/webix.css" type="text/css">

<!-- ... -->
<script type="text/javascript" src="https://cdn.webix.com/5.2/webix_debug.js"></script>
<script type="text/javascript" src="../../stylesheets/skin.js"></script><!-- add this -->- Check the result:

Read more
[1] webix skins
Final code for this exercise can be found here
Automatically switch data source for our widget when user clicks on an image attribute in the Device tree view
Test application for design responsiveness using dev tools
- Run Apache Tomcat from IntelliJ IDEA in debug mode

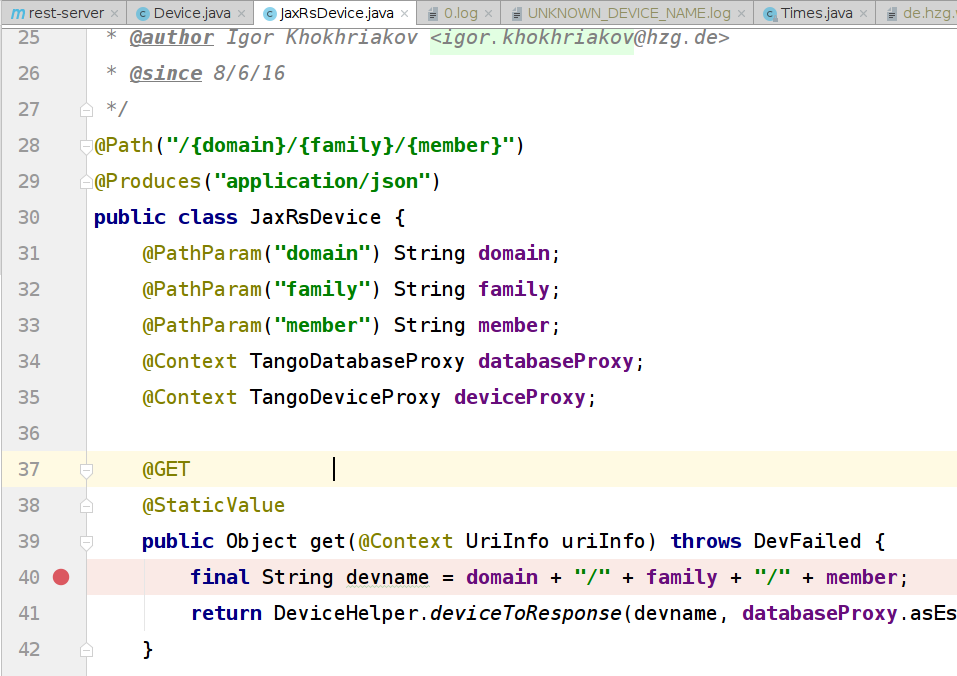
- Put a breakpoint on a particular Tango JAX-RS resource method e.g. JaxRsDevice#get:

- Now once client accesses Tango JAX-RS Device info rest-server will suspend at the breakpoint:

NOTE: to run Tango REST server with HTTP/2.0 a native tomcat HTTPS connector library must be installed. On Ubuntu/Debian it is libtcnative-1 e.g. Debian 9-bpo:
$> sudo apt-get install -t stretch-backports libtcnative-1
Reading package lists... Done
Building dependency tree
Reading state information... Done
libtcnative-1 is already the newest version (1.2.18-1~bpo9+1).
0 upgraded, 0 newly installed, 0 to remove and 167 not upgraded.
$>
Add SSL certificate properties to TangoRestServer startup script:
#!/bin/bash

echo "Using TANGO_HOST=$TANGO_HOST"

#USERNAME=`whoami`
USERNAME=ingvord
echo "Using USERNAME=$USERNAME"

TOMCAT_SSL_CERTIFICATE_FILE=/etc/ssl/certs/ssl-cert-snakeoil.pem
TOMCAT_SSL_CERTIFICATE_KEY_FILE=/etc/ssl/private/ssl-cert-snakeoil.key

#enable debug
JAVA_OPTS="-Xmx4G -Xshare:off -XX:+UseG1GC -agentlib:jdwp=transport=dt_socket,server=y,suspend=n,address=5009"
echo "Using JAVA_OPTS=$JAVA_OPTS"

/usr/bin/java -jar $JAVA_OPTS -DTOMCAT_SSL_CERTIFICATE_FILE=$TOMCAT_SSL_CERTIFICATE_FILE -DTOMCAT_SSL_CERTIFICATE_KEY_FILE=$TOMCAT_SSL_CERTIFICATE_KEY_FILE -DTANGO_HOST=$TANGO_HOST /home/$USERNAME/bin/rest-server-1.6.jar -nodb -dlist test/rest/0
Here we have used pre-generated ssl cert/key from Ubuntu/Debian ssl-cert package. This is OK for development, but for production you will need a valid certificate signed by an authority.
Next run TangoRestServer under root user:
$> sudo ./TangoRestServer
...
INFO: Starting ProtocolHandler ["http-nio-10001"]
Jan 24, 2019 3:58:29 PM org.apache.coyote.AbstractProtocol start
INFO: Starting ProtocolHandler ["https-openssl-apr-10041"]
DEBUG 2019-01-24 15:58:29,750 [main - test/rest/0 - o.t.w.s.t.TomcatBootstrap] o.t.w.server.tomcat.TomcatBootstrap.bootstrap:82 - Done.
Now if we access Tango REST server on port 10041 it will upgrade communication protocol to HTTP/2.0 aka h2:

If you do not see protocol column in the developer/network window right click on the table header.
[1] Exploring JS