-
Notifications
You must be signed in to change notification settings - Fork 2
CineRat 04 Software Installation and Setup
Goal of this page is to setup the flight controller, companion computer, and the ground station.
ONLY UBUNTU 22.04 SUPPORTED.
Our fork of the Betaflight configurator. Supports configuring the new modes in Indiflight and adapted the visualisation to the new coordinate frames.
Caveats: INDI page doesnt work yet; loading firmware online doesnt work
Download the latest .deb package from https://github.com/tudelft/indiflight-configurator/releases and install with
sudo dpkg -i indiflight-configurator_*amd64.debAndroid and Windows untested.
INDIflight firmware provides:
- INDI controller, similar to paparazzi
- Position/Velocity controller for multirotors
- Estimation of pos/vel fuses IMU and Optitrack is done with a simple PI observer; quite handwavy.
- Note: This mode could probably also be implemented with the standard PID controllers (bypassing the new INDI controller), but as of yet, it only works with INDI attitude/thrust control because it allows tracking a body-acceleration setpoint.
- Provides uplink/downlink interface via UART, using a custom high-speed protocol github.com/tudelft/pi-protocol
- existing interface MSP didn't seem fast or flexible enough, so something clean and standalone was made. However, it would have been better to use Alessandro's UART protocol which is similarly fast, but also supports a checksum to flag broken data.
- #todo This could still be done with relatively little effort.
- EKF for state estimation, which is more accurate.
However, this is still very experimental software. Make sure your disarm switch works and take appropriate safety measures. Most of the decade-long development of the PID logic in Betaflight has been thrown out the window and with it likely some robustness in edge-cases.
There is no "Load Online" firmware for now. Building works with docker on a local machine.
Download the code from [email protected]:tudelft/indiflight.git
git clone -b indi --recurse-submodules -j8 [email protected]:tudelft/indiflight.gitNow do the steps listed in the README.md to flash.
As described in that README, the first flash should be done with the
configurator using the the erase option.
Subsequently, you can flash without the configurator
- Connect FC to your laptop via USB
- Run
docker run --privileged -v ./:/indiflight indiflight dfu_flashin indiflight repo
- Connect FC to Raspberry via USB
- Connect to the raspberry pi wifi with your laptop
- Run
docker run --privileged -v ./:/indiflight indiflight remote_flash_dfuin indiflight repo
Flashing over SWD is faster and more convenient. Also it doesn't require any USB.
- Ensure that the raspberry pi has been connected to the SWD interface of the flight controller CineRat -- 03 Hardware build instructions#Raspberry Pi Zero 2W
- Connect to the raspberry pi wifi with your laptop
- Run
docker run --privileged -v ./:/indiflight indiflight dfu_swdin indiflight repo
On first connect to the Indiflight Configurator, do NOT load any custom defaults, if prompted. You should see that nothing works, and no available ports are displayed. That's fine.
For the MATEK743 on the CineRat, you can just load the file MTKS_CineRat_profile.txt in the Presets tab of the configurator.
Here are some explanations to some settings, although if the settings are not exactly the same as yours, that's also fine. This section was written a while ago.
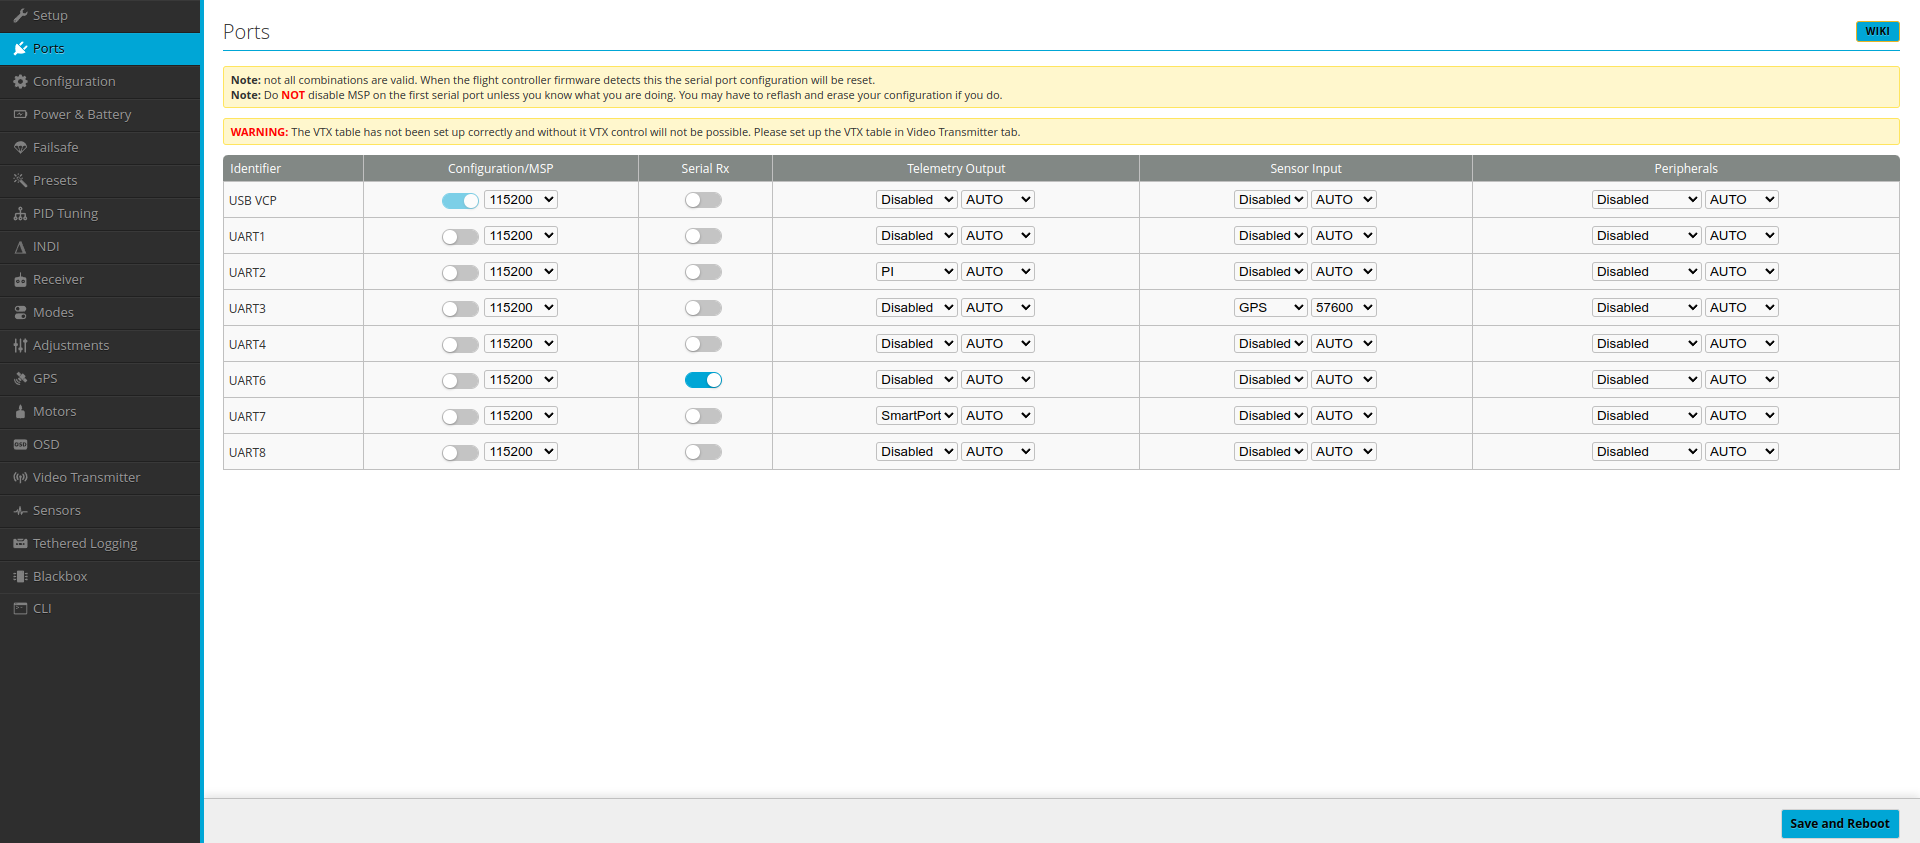 Note: "PI" will not show up if you are using Betaflight Configurator. If you loaded the preset file then it should still be configured, however, even if it doesn't show. GPS is optional, smartport telemetry is also optional.
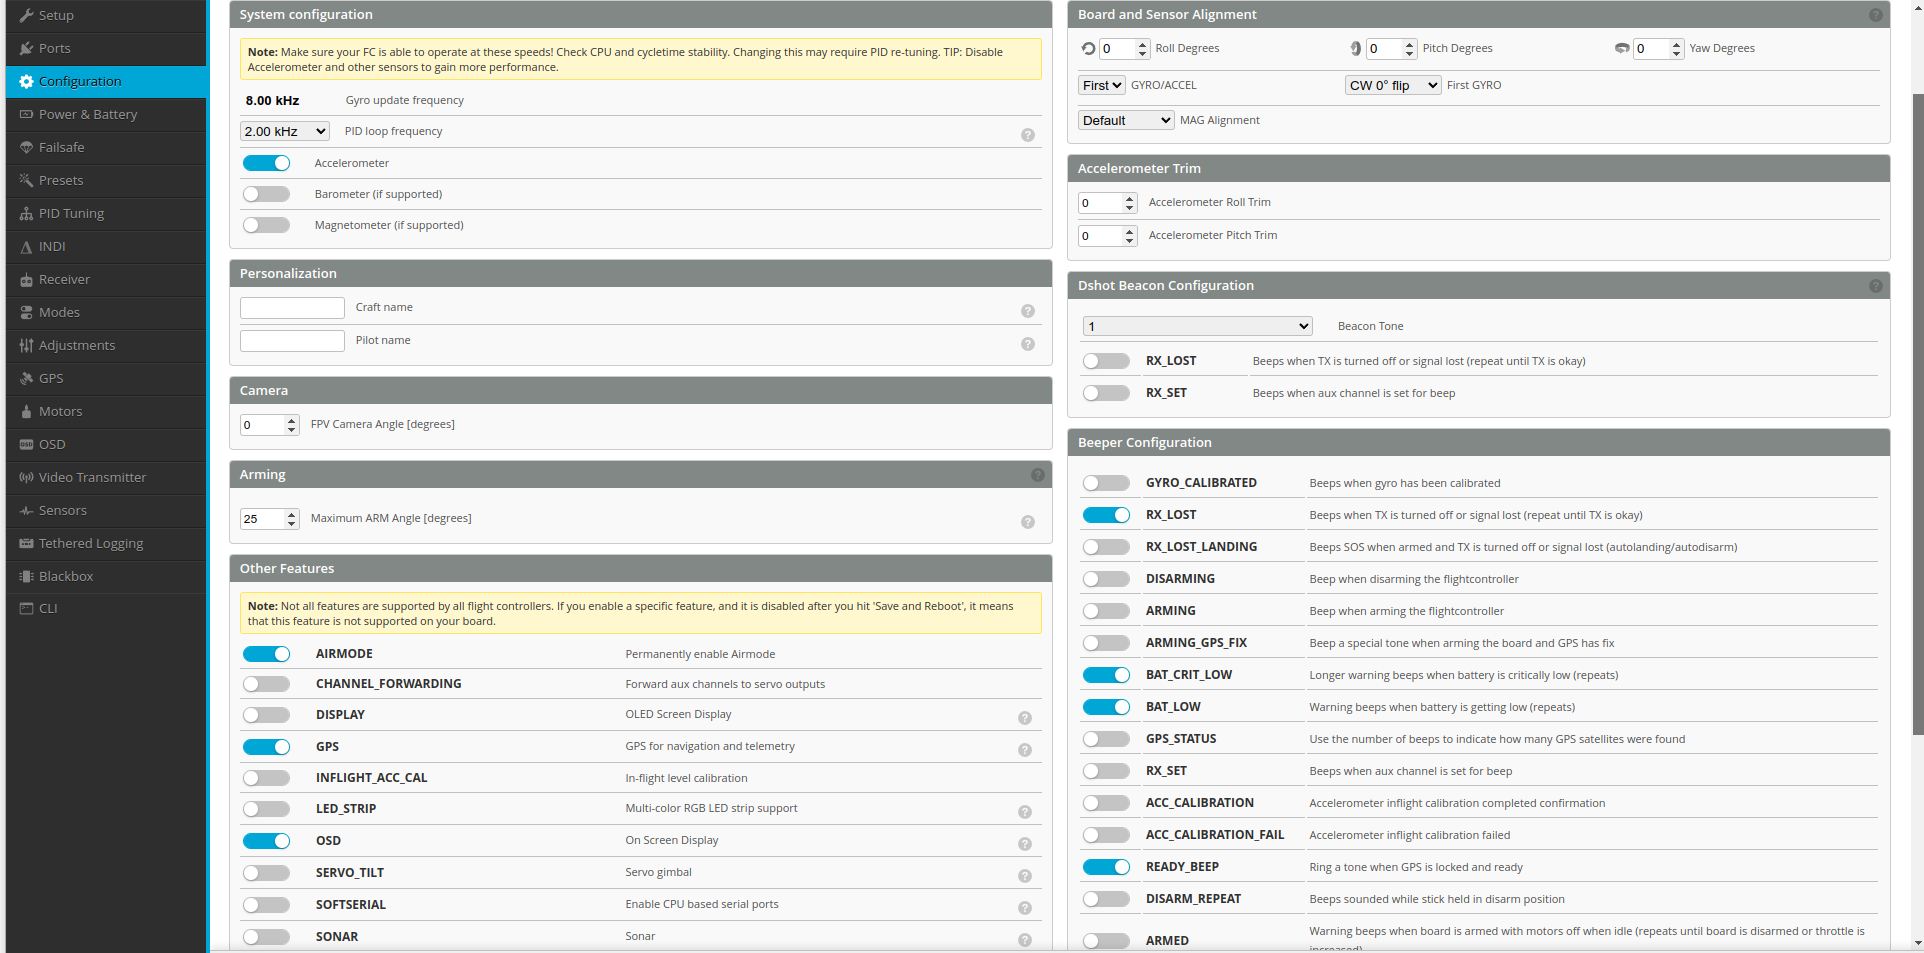 Beeper configuration to taste. If you use PID loop frequency (also INDI loop frequency) higher than 2kHz, check CPU load in CLI using command
 tasks and also reduce the Blackbox logging divider in the Blackbox tab (otherwise blackbox will also log faster).
 Amp scale unverified, probably inaccurate.
 Stage 2 guard time 0.5 is pretty low, but i'd like to be more safe than sorry.
A couple of parameters here also affect INDIflight:
- PID Profile
- has no effect, unless using the
LEGACY_PIDflight mode
- has no effect, unless using the
- Rateprofile Settings
- All are relevant, if flying in acro mode. None are relevant in any other mode.
- Set to taste, otherwise leave Betaflight default ("actual" rates)
- Filter Settings
- All non-d-term settings are relevant for INDI flight. I'm using quite low cutoff values for now, feel free to experiment
- all other settings have effect only if using the
LEGACY_PIDflight mode
has no effect for now
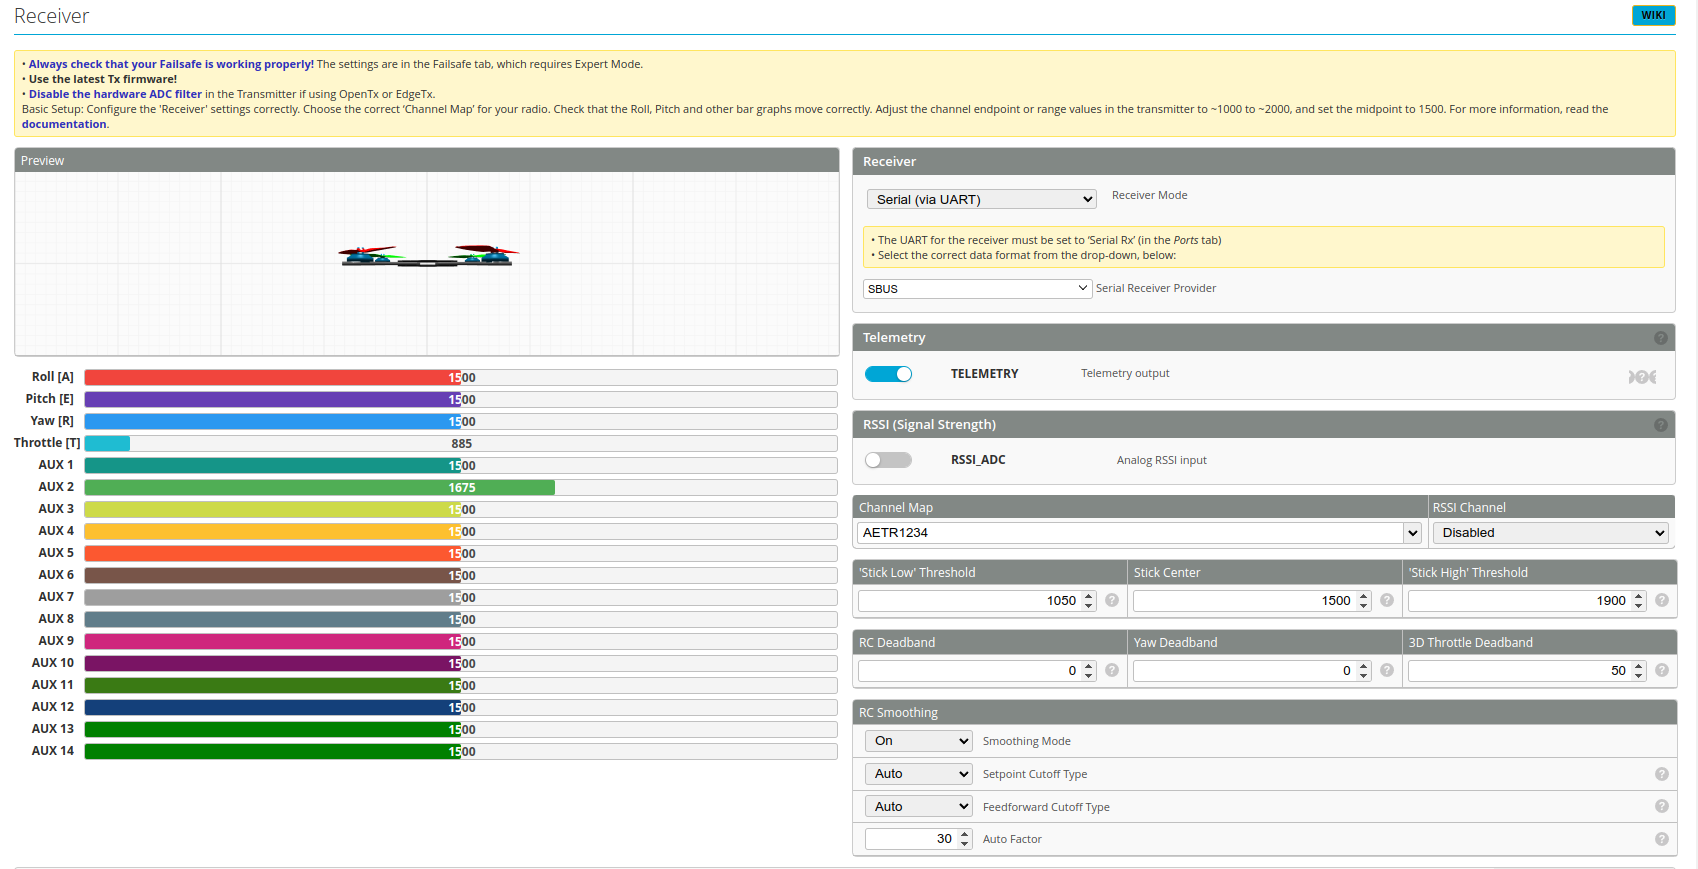
 I'm using PREARM for added safety.

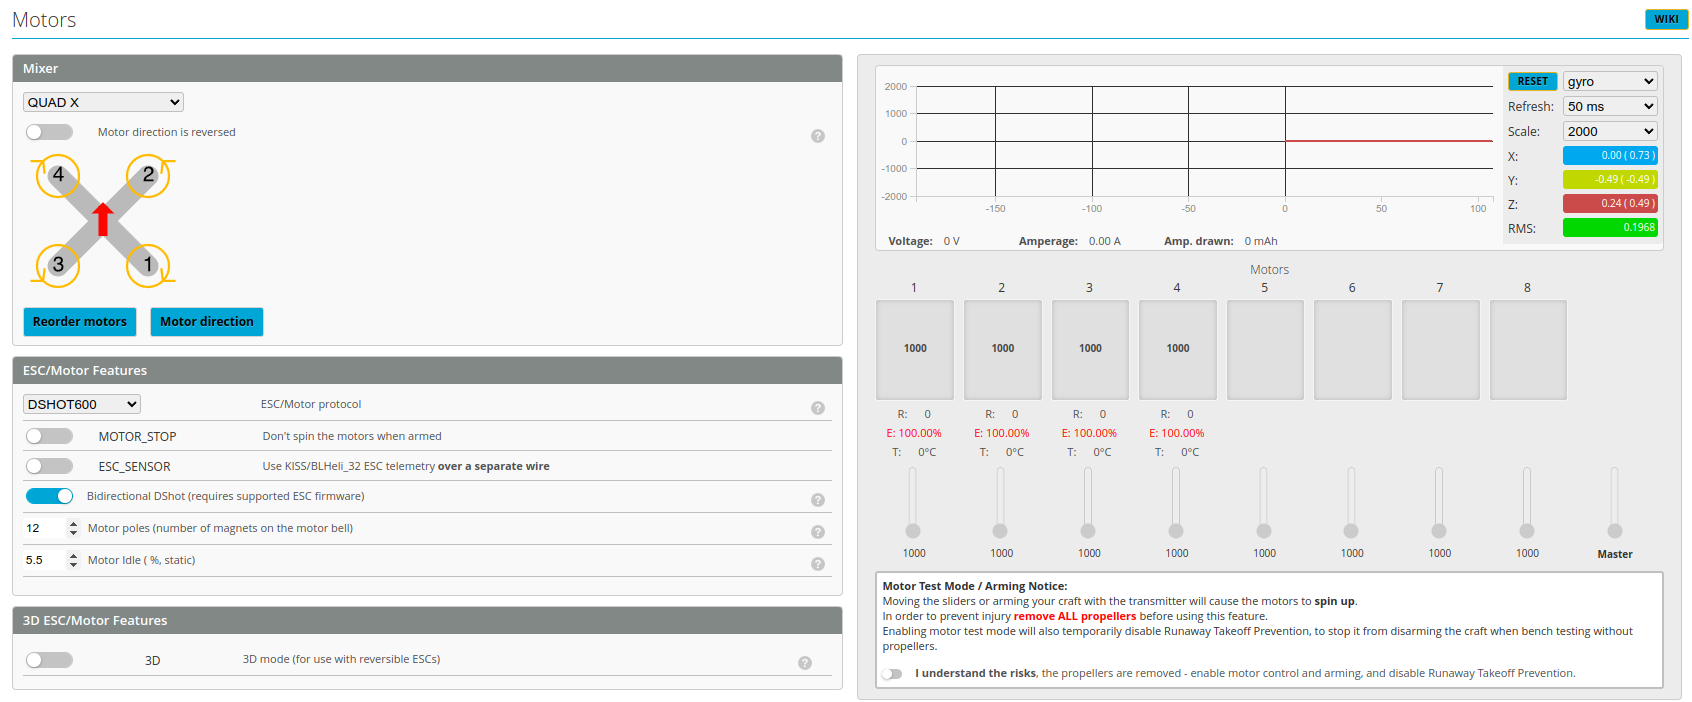 NOTE: remove all propellers and check ordering and direction of the motors (see preflight checklists)
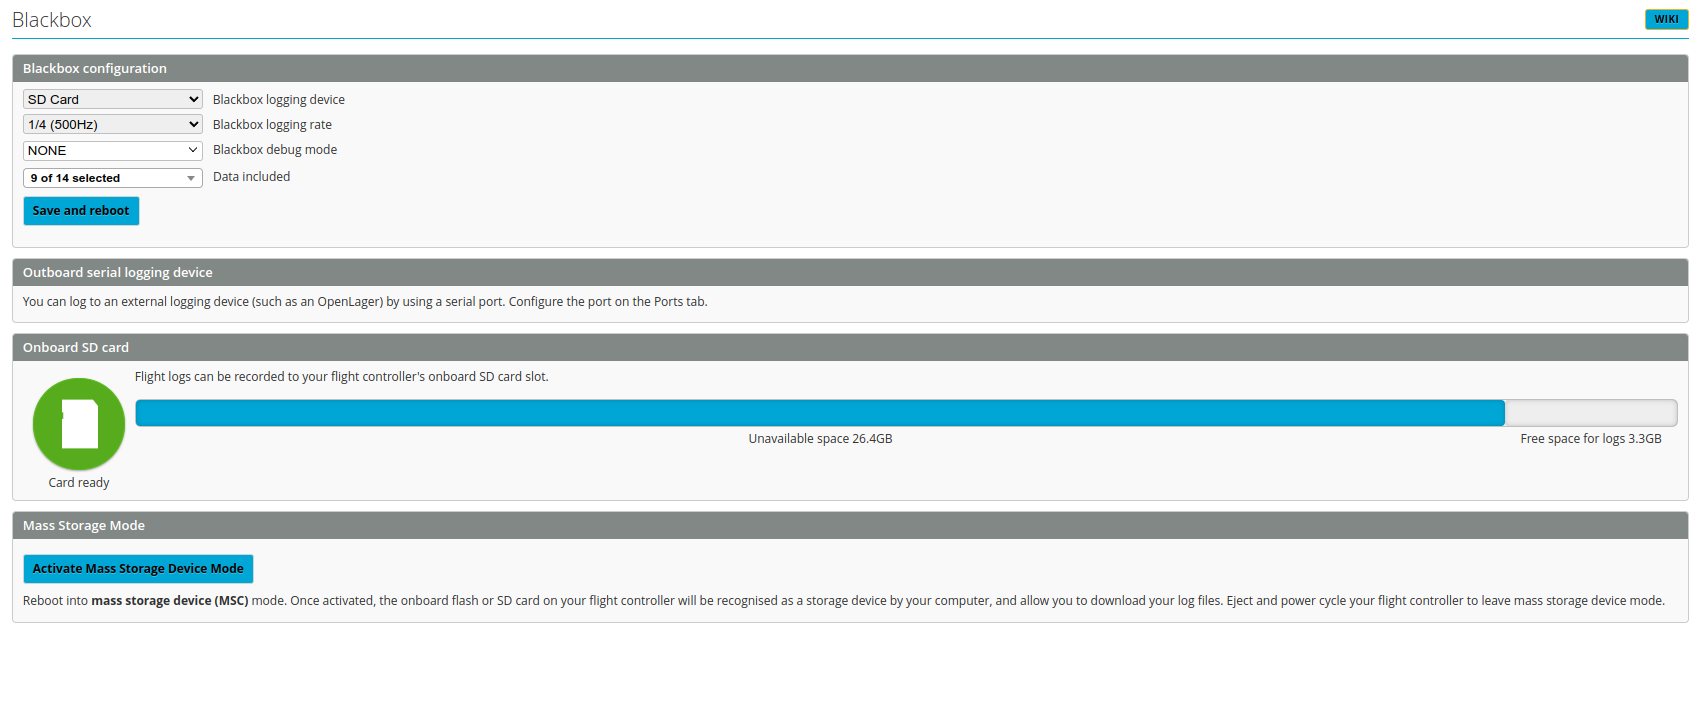 Logging above 500Hz may be spotty. You can try reducing the load by de-selecting some data. Non-critical data is e.g. GPS, Magneto, Battery, EKF, PID, setpoint, debug, RSSI, RC (if not flying manual), position (if not flying with position).
See list of known-good SD cards in CineRat -- 02 Parts List and 3D prints and instructions at #Optional -- INDIflight blackbox for logs.
Only covering EdgeTX remote with FrSky R-XSR receiver here:
Create a new model and setup channels and switches as shown below. This is pretty close to the "Paparazzi" model found on some RCs in the MAVLAB, so that should be copied when setting up the new model.


 (CH1 Ail not shown, same as CH2 Ele). Make sure to select sticks marked by the symbol in front on Ele, Thr and Rud, and not inputs marked by "I". Also make sure to invert SF, SE and SC (as shown by the
 - signs)
 (CH8 not shown, same as CH7)
If you connected and enabled smartport telemetry, make sure you have bound your RC to the receiver. Then, in Telemtry (page 10), click detect sensors. Then in DISPLAY:

Just flash the latest image of Racebian from https://surfdrive.surf.nl/files/index.php/s/kndkZOelKWptZtV as normal (image is generated from https://github.com/tudelft/racebian). It provides most software packages necessary to interface with UART and Wifi. However, it doesn't include the custom software to relay optitrack data yet; we'll have to install that manually for now. The concept is to make the Raspberry-pi as stateless as possible, that means that you should never have to login to it and do stuff. Everything should be automated from scripts of the ground-station laptop.
Everything below is lifted from the README.md. There are some additional cool features in the repo like seamlessly cross-compiling c-make projects using docker, and deploying them on the PI using rsync. This can probably also be used to deploy simulink applications on the PI in case the native mechanisms somehow don't work (zero 2W does not seem officially supported).
!!!BE CAREFUL TO NOT ACCEDENTALLY WIPE ANOTHER SD CARD!!!
For instance, if your SD card is /dev/mmcblk0.
sudo umount /dev/mmcblk0*
sudo dd bs=4M if=<path/to/the/image.img> of=/dev/mmcblk0 status=progressRe-insert the SD card into your Laptop, then change the configuration of the wifi access point at /etc/hostapd/hostapd.conf:
channel=11 # or 9, or 10. results in better performance in our typical environment

ssid=<change accespoint name to whatever you like>
Then unmount the SD card and boot the PI. You can connect to the Wifi with password betaflight.
Just do ssh [email protected] with password pi. In normal operation this shouldnt be needed.
If you need to pi to have internet access (for instance to install additional packages), you'll need to enable forwarding through your laptop with a script in the racebian repo, that you need to run on your laptop (see README.md):
cd racebian
sudo make install-pi-tools
sudo pi-routing-up 10.0.0.1The ground-station is a serial of commandline tools that use an Optitrack Client to receive data from the Optitrack Motive computer via LAN, process it (coordinate frames, frequency, filtering, velocity calculation, logging, ...) and send it to the pi. It also includes a utility to then forward it from the pi to the flight controller.
Read the README at https://github.com/tudelft/indiflightSupport/tree/main/Groundstation
In general clone https://github.com/tudelft/indiflightSupport because there
are more useful tools for simulation and log analysis.
To see the new fields in the right units, better attitude visualization and more, get the fork of blackbox viewer (Ubuntu only tested): https://github.com/tudelft/blackbox-log-viewer/releases/
sudo dpkg -i path/to/package.deb- Use a known-good SD card to save you frustrations CineRat -- 02 Parts List and 3D prints.
- Format the SD card with the official SD card association formatting tool available for Windows and Linux (use sudo) https://www.sdcard.org/downloads/formatter/
-
It is imperative that you follow this procedure when downloading logs. If you don't, then the SD card WILL be corrupted the next time you fly and you won't have logs (at least on the MATEKSYS with Ubuntu 22.04. We don't know why)
- Connect the flight controller via USB
- Bring device into MSC mode (blackbox tab in configurator)
- Mount the SD card and download logs
- Unmount/eject and do not remount
- Power-cycle the flight controller
This is also the procedure adopted in the CineRat -- 05 Flying Instructions and Checklists#After-flight checklist -- No USB or SWD connection
If you have a USB connection from the Flight Controller to the Raspberry Pi, then there is a script to automate points 3.3. through 3.5. which has fixed corruption issues for us completely.
Check the readme of indiflightSupport and CineRat -- 05 Flying Instructions and Checklists#After-flight checklist -- USB connection available