-
Notifications
You must be signed in to change notification settings - Fork 0
Virtual Machine on x86
July / August, 2024
Developed by:
Egon A. Ozer, MD PhD ([email protected])
Ramon Lorenzo Redondo, PhD ([email protected])
Windows 10 or 11 usually have virtualization turned on by default, so this step is usually not necessary. If you have an older system and/or try to follow the instructions below and receive an error from VirtualBox that says "VT-x is disabled in the BIOS for all CPU modes" or a similar message, you may have to change some BIOS settings to enable virtualization. This is a little different for each processor or computer manufacturer, but some general instructions for enabling this setting can be found here for Windows 11 or here or here for Windows 10.
-
Download and install
 VirtualBox for your system.
 -
Download the Lubuntu 22.04 disk image.
We are using Lubuntu for this workshop as it is relatively lightweight and runs more smoothly in a VM than a more fully-featured Linux distribution like Ubuntu, for example.
 WARNING: The file size is 3.1 Gb. There is a BitTorrent link to the software that may be safer and faster to download if you have a slow or unstable internet connection. Transmission is a good free BitTorrent client.
 -
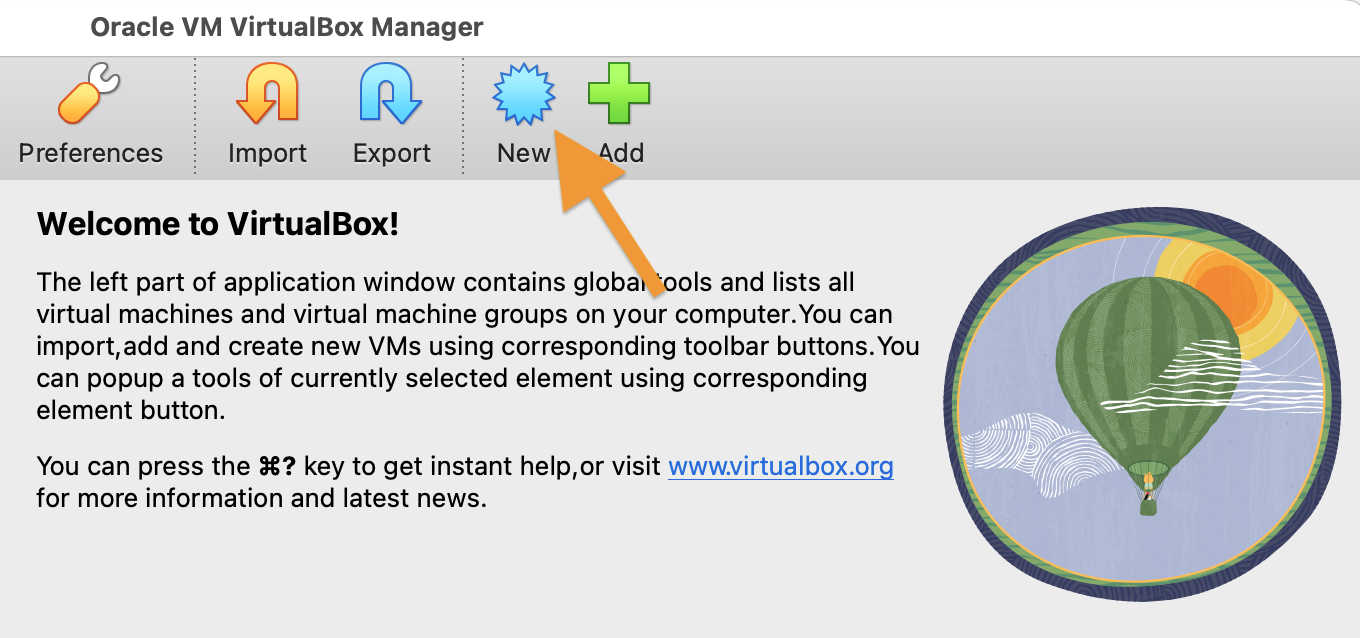
In VirtualBox, click the "New" button to create a new VM.

-
In the "Name" field enter "PathGen-2024" and in "ISO Image" navigate to the "lubuntu-22.04.4-desktop-amd64.iso" file you just downloaded in step 2.

-
On the next screen set the Base Memory to "4096" and set the Processors to at least "3".

-
Leave the "Create a Virtual Hard Disk Now" option selected and set the Disk Size to 40 Gb. Leave "Pre-allocate Full Size" UNchecked.

-
On the next screen click "Finish". A new window will appear in which the VM will boot up.
If the window is tiny: In the Virtual VM menu bar, select "View" --> "Virtual Screen 1" --> "Scale to 200% (autoscaled output)". Then you can drag the window to any size.
-
When the bootup completes, you will see the Lubuntu desktop. Double-click the "Install Lubuntu 22.04 LTS" icon on the desktop.

-
Click "Next" on the next few screens to select the location and keyboard layout defaults (or change them if you choose).
-
Select "Erase disk" and click the "Next" button. This will only erase the virtual hard drive in your VM, not your actual hard drive.

-
Enter your name as "Pathogen", your login name as "pathogen" and your password as "workshop". Check the "Log in automatically without asking for the password box"

-
On the next screen, click the "Install" button. Installation can take several minutes, or longer.
-
When the installation is completed, click "Done" and the VM will reboot into Lubuntu.

-
You will be prompted to install updates, which you should do. The password is "workshop" as entered in step 11 above.
-
After completing the updates, you must either shutdown or reboot the VM. To do so, click the blue bird icon in the bottom left of the screen to bring up the menu, then hover over "Leave", then click either "Reboot" or "Shutdown".

This work is licensed under a Creative Commons Attribution-ShareAlike 4.0 International License.
