-
Notifications
You must be signed in to change notification settings - Fork 26
Linking Toolkit to Gazelle
The Conformity Assessment environment uses both Gazelle and Toolkit but they are linked in a different way from that done for Connectathons.
Toolkit and Gazelle both use the term Test Session but it means something different in each system. Furthermore each system uses their Test Sessions in a different way for Connectathon vs. Conformity Assessment.
Gazelle creates a single Test Session for Connectathon. All activity at that event is logged under the Test Session. All vendor configurations are part of the Gazelle Test Session. The test session is identified by a number, say 53, which appears in the Gazelle URL.
Toolkit links to Gazelle at Connectathon by configuring the base Gazelle URL into toolkit.properties:
Gazelle_Config_URL=http\://ihe.wustl.edu/gazelle-na/systemConfigurations.seam?testingSessionId\=53
for example. With this configuration in place, all approved vendor system configurations can be downloaded to Toolkit using the Load all Gazelle configs button on the Toolkit Configuration tool. This makes network calls to a predefined URL off the the URL configured above pulling the OID configuration and the individual system configurations. These configurations are combined and used to generate the system configurations found in External_Cache/actors directory. Later a system-wide update can be pulled a second time in the same way or individual systems can be updated using the Reload from Gazelle button on the Systems Configuration tool. This reload can be done by the vendors since it does not require the admin password.
Note: There is a known bug (or maybe it is an inconvenient feature) in Gazelle that the OID labels that are used in the download are Test Session specific and are controlled by a configuration table. In Toolkit these labels are fixed. If Gazelle managers do not maintain a consistent configuration then this linkage between Gazelle and Toolkit breaks.
On the Toolkit side, one instance of Toolkit is used to service the entire Connectathon. The event uses one Test Session named default. Also, the default Environment is also named default and is used by everybody. It mainly holds the default codes configuration and certificates.
This shared copy of toolkit has worked because vendors know that if they wish to use the Conformance tool at Connectathon using the public copy of Toolkit they had to create their own Test Session in Toolkit. The Conformance tool uses the Test Session to store test results. They also have the option to use a private copy for this work
Up until now the CA configuration for toolkit was identical to that used at Connectathon except that a separate instance of Toolkit was installed for each vendor user. While Toolkit has the capacity to manage multiple vendors in a single instance, there is no privacy between vendors. Any vendor can select any Test Session, launch the Conformance tool and view the other’s results. So, we have advised the managers of the IHE CA program to install a separate instance of toolkit for each vendor under test. That has worked up until now. Privacy has been enforced via authentication to the CAS VM.
At the moment, Toolkit users have no privacy of Test Sessions. Any Toolkit user could view contents of another Test Session. To accommodate Toolkit users wanting private Test Sessions (and to improve focus of Test Sessions for other users), Toolkit needs to know the current User Id, which is gained through some form of authentication.
Authentication of the user credentials can be delegated to an external service provider using Open Authorization (OAuth) which provides Toolkit of the User Id token accessing the Toolkit GUI. For the test pilot of the OAuth, an open-source component called Membrane Proxy will be used as a reverse proxy. The proxy will be configured to use GitHub as the OAuth provider.
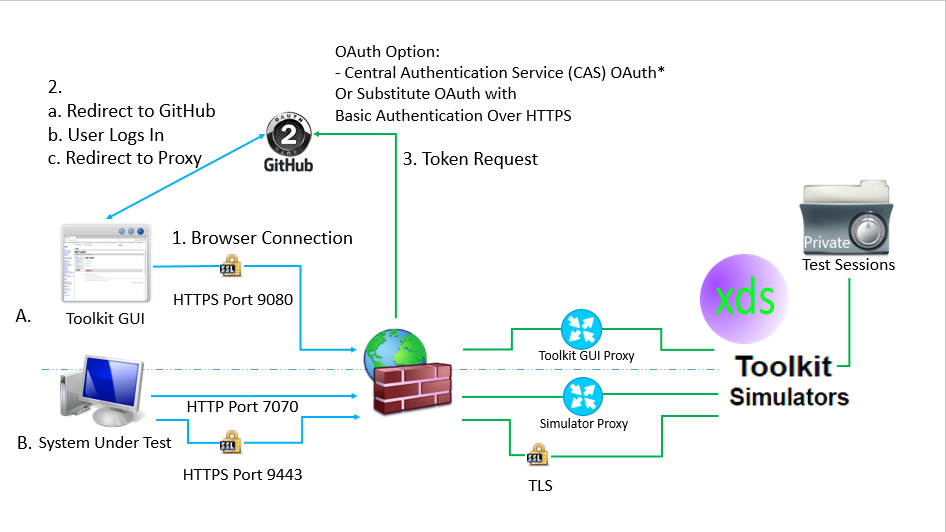
In more detail, a toolkit user encountering authentication as they attempt to access Toolkit will have their browser redirected to GitHub where they will sign-in by providing a username and password. If they allow their browser to store this information then they will not be prompted each time it is needed and this will be invisible.
Behind the scenes the Integrated Toolkit will be notified of the user’s ID. We use the term Integrated Toolkit because we have introduced a reverse proxy (Membrane) to manage the user’s access to Toolkit. It provides the following functions:
Manage the OAuth integration<br /> Port redirection<br /> URL filtering
It may be possible to provide these functions with a firewall but given that Toolkit lives in several environments and at least one of these the will not allow additional firewalls to be used (and will not accommodate us by letting us specify port rewrite rules), we have used Membrane.
Membrane is capable of providing a recording proxy but we have not configured this functionality.
A firewall is still necessary to protect the raw Toolkit port from public access. A typical Toolkit configuration includes two ports: one for non-TLS access and one for TLS. The non-TLS port is used for accessing the UI and for non-TLS access to simulators. This dual use of a single port on the raw Toolkit necessitates the port redirect and URL filtering functions. Accessing the GUI will require OAuth authentication and accessing the non-TLS simulator endpoints will not. We believe that the TLS ports do not need protection since they require bidirectional authentication and this is more difficult to configure in a browser (in an attempt to access Toolkit GUI).
Prerequisite:
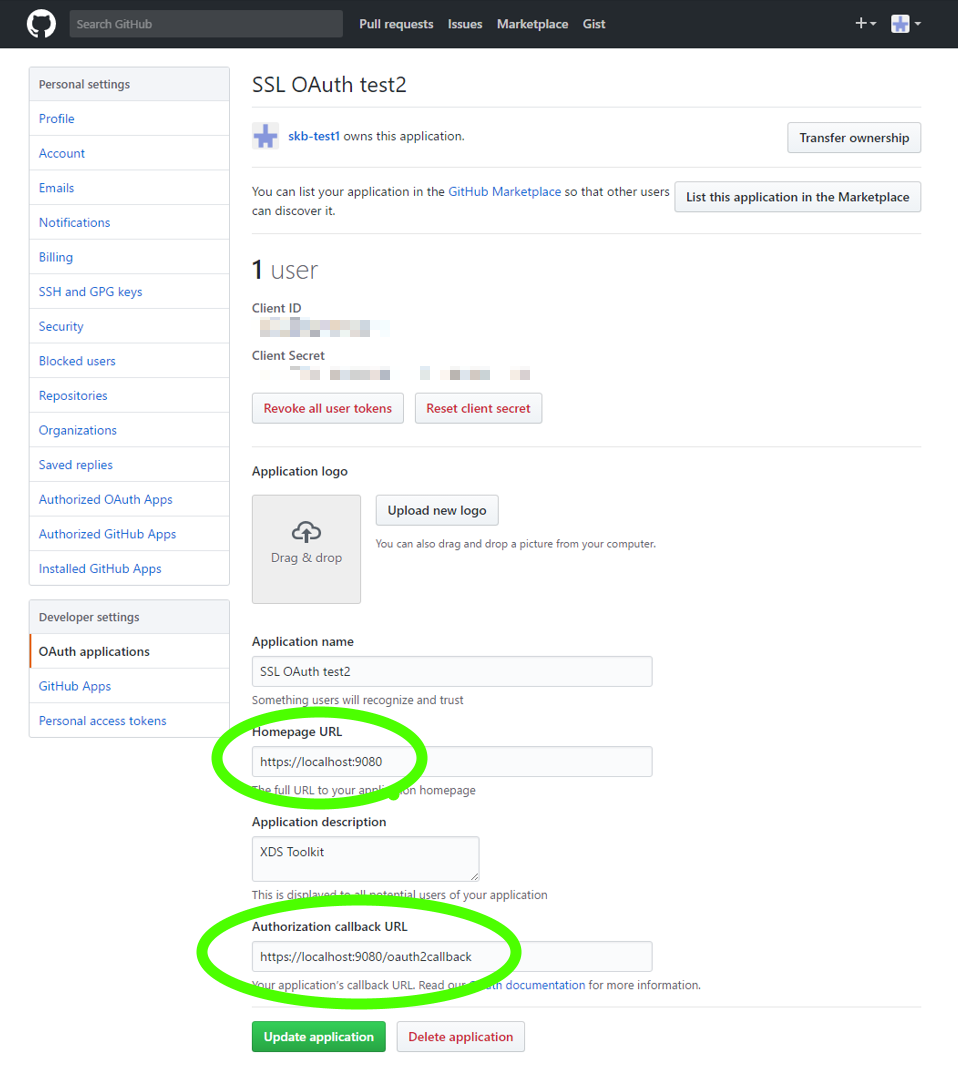
The Toolkit administrator must complete a one-time registration of the OAuth relying web application in the OAuth provider and use the secret keys in the oauth2Resource part of the proxy’s XML configuration file.
A completed OAuth web application in GitHub should look like the image below. Important: Note the Homepage URL and the Callback URL.

Once the OAuth web application has been registered, copy the value of the Homepage URL into publicURL and the generated Client ID and Secret Key in the oauth2Resource\github part of the serviceProxy Port 9080 XML configuration as shown in the excerpt below.
		<oauth2Resource publicURL="https://localhost:9080">
			<github
					clientId="$clientId$"
					clientSecret="$clientSecret$" />
		</oauth2Resource>
Proxy is mainly used for two purposes. Granting secured access to Toolkit GUI through HTTPS and OAuth and providing access to non-TLS simulators. Toolkit GUI access is configured through the serviceProxy element Port 9080. Non-TLS simulator access is configured through the serviceProxy element Port 7070. A complete configuration is shown below.
<router>
		<serviceProxy port="9080">

                        <!-- SSL Termination. The SSL element below secures reverse proxy connection on Port 9080. Connections to Port 9080 to 8888 will be unsecured behind the firewall. The Java Keystore files are to be replaced with a real certificate that the client's browser will see and accept. -->
			<ssl>
				<keystore location="../../../conf/membrane.jks" password="xxx" keyPassword="xxx" />
				<truststore location="../../../conf/membrane.jks" password="xxx" />
			</ssl>
			<headerFilter>
				<exclude>X-Authenticated-Login</exclude>
			</headerFilter>

                        <!-- This is the Toolkit reverse proxy host. If the Toolkit web application has a web server context, such as '/xdstools4/' then the complete URL is the one that needs to be advertised. -->
			<oauth2Resource publicURL="https://localhost:9080">
				<github
						clientId="$clientId$"
						clientSecret="$clientSecret$" />
			</oauth2Resource>

                        <!-- cannot access non-TLS sims through this port -->
			<rewriter>
        		       <map from="^/sim" to="/sorry.html?"/>
    		        </rewriter>
                        <!-- This is the Tomcat non-TLS port where raw Toolkit lives -->
			<target host="localhost" port="8888" />
		</serviceProxy>
                <!-- redirect simulator endpoints on port 7070 to the raw Toolkit on 8888 -->
		<serviceProxy port="7070">
			<path>/xdstools2-4.4.0-SNAPSHOT/sim</path>
			<target host="localhost" port="8888" />
		</serviceProxy>
</router>
-
Linking Toolkit to an OAuth provider (GitHub)
-
A secure browser connection is made to Toolkit using an URL such as
https://example.com:9080/xdstools2-4.4.0-SNAPSHOT/. -
When the proxy detects missing user authorization
-
The proxy redirects the user’s browser to GitHub.
-
User logs in GitHub and authorizes Toolkit to read their Public Profile (User Id Token).
-
GitHub redirects the browser to the Proxy OAuth token requester.
-
-
Proxy requests User Id from GitHub.
-
-
An SUT accessing Accessing Toolkit Simulators
-
HTTP Port 7070 is used to access Non-TLS Simulators (through the Proxy). GUI Access through this proxy port is restricted.
-
HTTP Port 9443 is used to access TLS Simulators (No-proxy). GUI Access should not be allowed through this port through the Web Server TLS port configuration.
-
Optional providers:
-
Other OAuth providers such as CAS OAuth(*) should work in similar fashion. See this page for more details on using other OAuth providers:
http://membrane-soa.org/service-proxy-doc/4.4/oauth2-openid.htm -
Basic Authentication over HTTPS can also be used with Proxy.
-
-
Use of the proxy affects what goes into toolkit.properties in the following ways.
Toolkit Host is the hostname of the proxy which need not be the same hostname where Toolkit is installed. Proxy and Toolkit can reside on different machines.
Toolkit Port is configured as the serviceProxy port (7070 in this example). That way when Toolkit displays the simulator configurations, the port shown will direct the traffic through the proxy. The raw toolkit port (configured in Tomcat) will be blocked (guarding the GUI).
Toolkit TLS Port is unchanged - use whatever is configured into Tomcat (same as when not using proxy)
Passed: 9080 (GUI to the proxy), 7070 (proxied non-TLS simulators)
Blocked: 8888 (raw GUI and raw non-TLS simulators)
Toolkit
Downloads
Installing Toolkit
Configuring Toolkit for Imaging Tests
Reporting Toolkit Installation Problems
Environment
Test Session
Conformance Test Tool
Writing Conformance Tests
Overview of Imaging Tests
Test Context Definition
Launching Conformance Tool from Gazelle
Inspector
External Cache
Support Tools
Test Organization
Configuring Test Kits
Managing Multiple Test Kits
SAML Validation against Gazelle
Renaming Toolkit
Toolkit API
Managing system configurations
Configuring Toolkit for Connectathon
Developer's blog