-
Notifications
You must be signed in to change notification settings - Fork 11
Quick Tutorial Japanese
Akinori Yamada edited this page Aug 21, 2014
·
7 revisions
まずセットアップを参考に、Aeromockのインストールを行います。
チュートリアルはAeromockのリポジトリにあります。
$ git clone [email protected]:CyberAgent/aeromock.gitAeromockが対応するテンプレートで簡単に動作が確認できる内容になっています。
チュートリアルを動作させるために、~/.aeromock/config.yamlを作成します。config.yamlでは、Aeromockのプロジェクト設定ファイルであるproject.yamlのパスを指定します。
Freemarkerのチュートリアルの場合、以下のように指定します。path-to-pathはaeromockをcloneした場所を指定してください。
project_config_path: ~/path-to-path/aeromock/tutorial/freemarker/project.yamlAeromockを起動して、動作を確認します。aeromockコマンドで起動します。
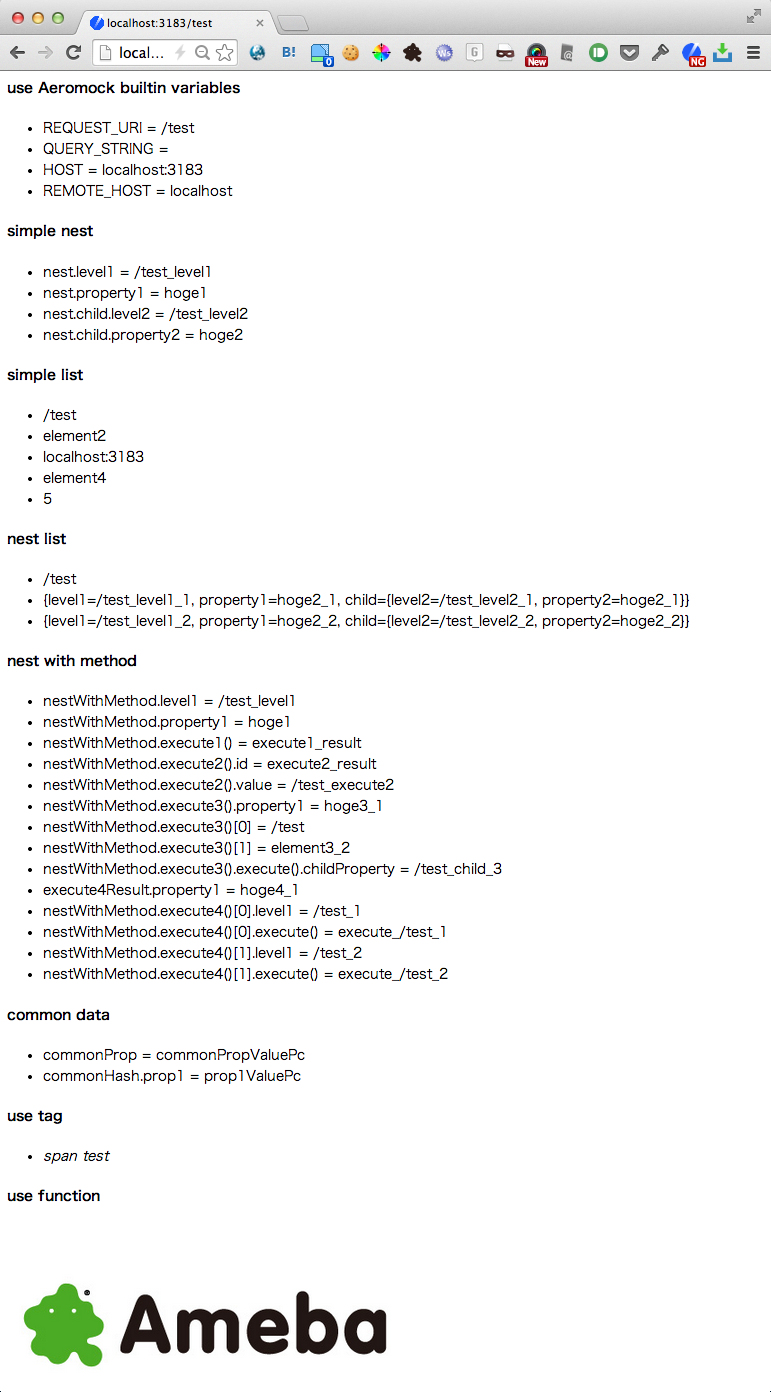
$ aeromockAeromockはポート3183で動作しています。チュートリアルのページは http://localhost:3183/test で確認できます。

利用しているテンプレートはtutorial/freemarker/template/test.ftlで、対応するデータファイルがtutorial/data/test.yamlです。これらを照らしあわせながら確認してみてください。
例として'simple nest'のエリアを見ていきましょう。
<h4>simple nest</h4>
<ul>
	<li>nest.level1 = ${nest.level1}</li>
	<li>nest.property1 = ${nest.property1}</li>
	<li>nest.child.level2 = ${nest.child.level2}</li>
	<li>nest.child.property2 = ${nest.child.property2}</li>
</ul>これに適用させるデータは以下のようになります。REQUEST_URIという変数が埋め込まれていますが、Aeromock標準のビルトイン変数を埋め込むことも可能です。
nest:
  level1: ${REQUEST_URI}_level1
  property1: hoge1
  child:
    level2: ${REQUEST_URI}_level2
property2: hoge2nest with methodというエリアでは、オブジェクトのメソッド呼び出しが行われています。
<h4>nest with method</h4>
<ul>
	<li>nestWithMethod.level1 = ${nestWithMethod.level1}</li>
	<li>nestWithMethod.property1 = ${nestWithMethod.property1}</li>
	<li>nestWithMethod.execute1() = ${nestWithMethod.execute1()}</li>
	<#assign execute2Result = nestWithMethod.execute2()/>
	<li>nestWithMethod.execute2().id = ${execute2Result.id}</li>
	<li>nestWithMethod.execute2().value = ${execute2Result.value}</li>
	<#assign execute3Result = nestWithMethod.execute3()/>
	<li>nestWithMethod.execute3().property1 = ${execute3Result.property1}</li>
	<#list execute3Result as element>
	<li>nestWithMethod.execute3()[${element_index}] = ${element}</li>
	</#list>
	<li>nestWithMethod.execute3().execute().childProperty = ${execute3Result.execute().childProperty}</li>
	<#assign execute4Result = nestWithMethod.execute4()/>
	<li>execute4Result.property1 = ${nestWithMethod.execute4().property1}</li>
	<#list execute4Result as element>
	<li>nestWithMethod.execute4()[${element_index}].level1 = ${element.level1}</li>
	<li>nestWithMethod.execute4()[${element_index}].execute() = ${element.execute()}</li>
	</#list>
</ul>
```
`__methods`という特殊なプロパティを作成すると、メソッドと返す値を定義することが出来ます。
```Ruby
nestWithMethod:
  level1: ${REQUEST_URI}_level1
  property1: hoge1
  __methods:
    - name: execute1
      value: execute1_result
    - name: execute2
      value:
        id: execute2_result
        value: ${REQUEST_URI}_execute2
    - name: execute3
      value:
        property1: hoge3_1
        __list:
          - ${REQUEST_URI}
          - element3_2
        __methods:
          - name: execute
            value:
              childProperty: ${REQUEST_URI}_child_3
    - name: execute4
      value:
        property1: hoge4_1
        __list:
          - level1: ${REQUEST_URI}_1
            __methods:
              - name: execute
                value: execute_${REQUEST_URI}_1
          - level1: ${REQUEST_URI}_2
            __methods:
              - name: execute
                value: execute_${REQUEST_URI}_2
```

##### 共通データ
`common data`のエリアでは、test.yamlで定義されていないデータを参照していますが、これは共通データファイルから参照されます。

```html
<h4>common data</h4>
<ul>
	<li>commonProp = ${commonProp}</li>
	<li>commonHash.prop1 = ${commonHash.prop1}</li>
</ul>
```

共通データファイルとして、以下の2つがあります。`commonProp`, `commonHash`はこちらで定義しています。

* [tutorial/data/common/common_pc.yaml](https://github.com/CyberAgent/aeromock/blob/master/tutorial/data/common/common_pc.yaml)
* [tutorial/data/common/common_sp.yaml](https://github.com/CyberAgent/aeromock/blob/master/tutorial/data/common/common_sp.yaml)

これらは、[tutorial/freemarker/data.groovy](https://github.com/CyberAgent/aeromock/blob/master/tutorial/freemarker/data.groovy)において、ユーザーエージェントでどちらが適用されるかが決まります。

```Groovy
if (USER_AGENT =~ /(iPhone|Android)/ ) {
    return ["common/common_sp"]
} else {
    return ["common/common_pc"]
}
```

##### カスタムタグ
`use tag`のエリアでは、`@span`というカスタムタグを利用しています。

```html
<h4>use tag</h4>
<ul>
    <li><@span style="font-style: italic;">span test</@span></li>
</ul>
```

このカスタムタグの実装は、[tutorial/freemarker/tag/span.groovy](https://github.com/CyberAgent/aeromock/blob/master/tutorial/freemarker/tag/span.groovy)です。

`@span`の出力内容を制御することができます。

```Groovy
_writer.write("""<span""")

// add class attribute
_writer.write(""" class="special-span" """)

// write tag attributes
for (entry in _params) {
    _writer.write(""" ${entry.key}=\"${entry.value}\"""")
}

_writer.write(""">""")
if (_body != null) {
    // render inner body.
    _body.render(_writer)
}
_writer.write("""</span>""")
```

##### カスタムファンクション
`use function`のエリアでは、`staticUrl`というカスタムファンクションを利用しています。

```html
<h4>use function</h4>
<div>
    <img src=${staticUrl("/img/sample.jpg")} />
</div>
```

このカスタムファンクションの実装は、[tutorial/freemarker/function/staticUrl.groovy](https://github.com/CyberAgent/aeromock/blob/master/tutorial/freemarker/function/staticUrl.groovy)です。

相対パスから画像のURLを導き出します。
```Groovy
if (arguments.isEmpty()) {
  throw new RuntimeException("Argument required")
}

return "http://$HOST${arguments[0]}"
```