-
Notifications
You must be signed in to change notification settings - Fork 7
emergeTray
Like Windows Explorer’s system tray, emergeTray shows icons representing system or program features running in the background.
To configure emergeTray, Ctrl-right-click the window and click on Configure,

and you get the configuration dialog box below.

The settings on the General tab allow you to:
-
Snap the window position to the edges of the monitor and of the other windows.
-
Snap the size of the window to other windows next to it.
-
Automatically size the window around the icons (and specify the amount of icons per row or column, depending on Orientation in Position tab below).
-
Switch the “clickable” area from the window to whatever is behind it if you check Click Through and select Full.
Important notes: To click on an icon in this setting, you must Shift-click it. To access the applet’s menu in this setting, you must Shift-Ctrl-right-click the window instead of just Ctrl-right-click. Likewise, to move it you must Shift-Ctrl-click the window, and to resize it you must Shift-Alt-click a border.
-
Or switch the “clickable” area from the window’s background to whatever is behind it, but still keep the icons (and the border) themselves “clickable” if you check Click Through and select Background.
Important notes: To access the window’s menu with this setting, you must Ctrl-right-click an icon or the border, not the background. Likewise, to move the window you must either Ctrl-click an icon or the border, and you still can resize the window by Alt-clicking a border.
-
Set the spacing between icons.
Like in the Explorer shell, icons can stay hidden in emergeTray until you hover the mouse over their area.
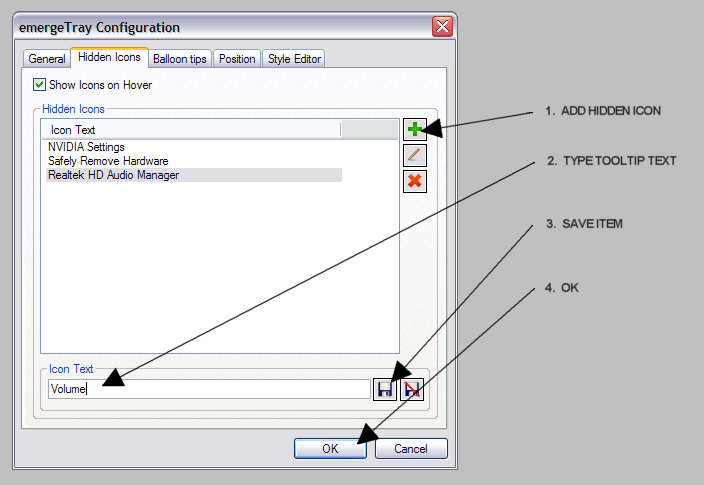
There are two ways to set the hidden icons. One is on the next tab, Hidden Icons:
-
Follow the instructions on the picture below. Note that in step 2, you may enter just part of the the tooltip text (text that appears when you hover the mouse over the icon).

-
An easier way which doesn’t require opening the configuration dialog box is to Alt-click the icon, and it goes right into hiding!
A great feature of emergeTray is the flexibility that it gives you with the icons whose look changes depending on their status: you can hide only the icon with the status of your choice:
- Let’s take as an example the network connection. It shows one icon when the computer is connected and an other one when the computer isn’t. (This is assuming the connection property is set to show the icon.) If you want to see only the “Not connected” icon, Alt-click the icon while the computer is connected. The “Connected” icon disappears. Now disconnect the computer and Voilà! the “Not connected” icon shows up.
- Or, using the dialog box, you can enter (part of) the tooltip text which appears only with the status you want hidden (“Connected”).
- To hide both icons, Alt-click each one. Or, using the dialog box, enter (part of) the tooltip text which appears during both status (“Local Area Connection”).
To make an icon visible again, highlight its text in the Hidden Icons window and click on the Remove Hidden Icon button  .
.
The Balloon tips tab allows you to customize the balloons which open up automatically for a few seconds next to tray icons to notify you that an event has taken place (uploading completed, network connection set, etc.)

The fonts of the title and the message can be changed, as well as the background, with a choice of different gradients in Methods (Method > Solid = no gradient), opacity level, and Text and Border Colors.
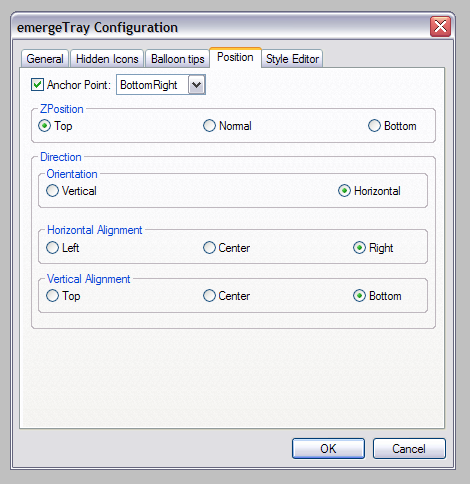
The Position tab allows you to:
- Anchor the window to the monitor location of your choice.
- Show the hidden icons when hovering the mouse over this window.
- Set the window as always on the top, in normal position, or always under other windows (ZPosition).
- Set the icons’ direction vertically (column of icons) or horizontally (row of icons).
- Set the horizontal and vertical alignments of icons within the border.

For the settings on the Style Editor tab, see Style Editor page.
Configuration of the other running applets: