-
Notifications
You must be signed in to change notification settings - Fork 99
V0.4 Configuring a DSLR With No Download
Note: These instructions are in beta. Please notify me with any issues or corrections, or just to say things worked for you.
This guide assumes you have read and performed all of the steps in the Configuring a DSLR tutorial. If you have not done so, complete the guide and return here when you are finished.
These instructions assume you are running OctoPi, but the instructions for other types of Linux installations would be very similar.
It is possible to prevent Octolapse from downloading the images from your camera to your server entirely. Since it takes quite a bit of time to transfer and save an ultra high resolution image, simply not downloading your DSLR images will drastically reduce the time it takes to acquire a snapshot, which will improve print quality by reducing oozing.
Unfortunately, there are also disadvantages to this method. First, it's less likely for this guide to be compatible with your camera than the download method since not all cameras support saving to SD via remote control. Second, since the images remain on your DSLR, you will have to render your timelapse manually and you won't get any snapshot previews within the Octolapse tab. Additionally, Image Transposition settings within your camera profile will not work. However, if you want to render your videos manually from images stored on your camera's SD card, and you don't mind not having a timelapse preview, this is the guide for you!
First we have to add a new script, which we'll call our 'Camera Initialization Script'. This script will tell your camera to save all images to the SD card instead of to internal memory.
Important Note: Some cameras do NOT support configuration via GPhoto2. We will run some tests during this tutorial to see if things are working properly.
I put my script in /home/pi/scripts by navigating to the following directory:
cd /home/pi/scripts
The config options vary by camera and by the gphoto2 version. You can run the following command to see what options for capturetarget are available on your camera:
gphoto2 --auto-detect --get-config capturetarget
Here's what my camera reports after running this command:
Label: Capture Target
Readonly: 0
Type: RADIO
Current: Memory card
Choice: 0 Internal RAM
Choice: 1 Memory card
END
If your options aren't the same as mine (Memory card = 1) you will have to adjust the initialize-camera-save-to-sd.sh script accordingly.
Next, create a new script file with the nano editor like so:
nano initialize-camera-save-to-sd.sh
This will open the nano editor. Copy the following script and paste it into the nano editor by pressing the right mouse key.
Important Note: The very first line #!/bin/sh is important, and must be included.
#!/bin/sh
# Camera Initialization Script
# Sets the capture target to the SD card
# Written by: [email protected]

# Put the arguments sent by Octolapse into variables for easy use
CAMERA_NAME=$1
# Set camera to save images to flash memory
# IMPORTANT:  The capturetarget setting may vary.  Run 'gphoto2 --auto-detect --get-config capturetarget' to determine the appropriate setting
gphoto2 --auto-detect --set-config capturetarget=1
Important Note: Make sure you are absolutely certain that you have used the proper capturetarget settings we determined from the previous step. If this is wrong images will not be saved to your SD or internal memory!
Now we need to save the script. Press ctrl + o and then Enter to save. Then press ctrl + x to exit.
Now we need to add execute permission to the script with the following command
chmod +x initialize-camera-save-to-sd.sh
Now we will test the script with this command:
./initialize-camera-save-to-sd.sh
Note: The ./ is important, so make sure you copy that part.
If you encounter an error here, you should search the internet for a solution. I am planning to compile common errors and include them in a troubleshooting guide, but this is not yet complete. If you encounter an error and find a solution, please let me know and I will add it to the guide.
Next, we will need to create a new script to take the actual snapshot. Again, we need to create a new file with the nano editor like so:
nano trigger-snapshot.sh
Again, this will open the nano editor. Copy the following script and paste it into the nano editor by pressing the right mouse key.
Important Note: The very first line #!/bin/sh is important, and must be included.
#!/bin/sh
# Camera Capture Script - Leave on Camera, Don't download
# Requires a camera initialization script with the following command:  gphoto2 --capture-image --set-config capturetarget=1
# Written by: [email protected]
# Put the arguments sent by Octolapse into variables for easy use
SNAPSHOT_NUMBER=$1
DELAY_SECONDS=$2
DATA_DIRECTORY=$3
SNAPSHOT_DIRECTORY=$4
SNAPSHOT_FILENAME=$5
SNAPSHOT_FULL_PATH=$6

# trigger the camera and exit immediately
gphoto2 --auto-detect --trigger-capture
Now we need to save the script. Press ctrl + o and then Enter to save. Then press ctrl + x to exit.
We need to add execute permissions to this script as well like so:
chmod +x trigger-snapshot.sh
Now we will test this new script with the following command:
./trigger-snapshot.sh
Note: The ./ is important, so make sure you copy that part.
Your camera should take a snapshot, and it should be quite a bit faster than the normal download method you used in the Configuring a DSLR guide.
If you encounter an error here, you should search the internet for a solution. I am planning to compile common errors and include them in a troubleshooting guide, but this is not yet complete. If you encounter an error and find a solution, please let me know and I will add it to the guide.
Note: Not all cameras support the 'trigger-snapshot' command unfortunately. On my camera, the Nikon D5200, 'trigger-capture' returns after the snapshot is taken but before it is saved to SD. Some cameras return BEFORE the image is taken. In this case you may need to make some changes to trigger-snapshot.sh. Specifically you'll need to add a sleep 1 command right after gphoto2 --trigger-capture, which would look like this:
#!/bin/sh
# Camera Capture Script - Leave on Camera, Don't download
# Requires a camera initialization script with the following command:  gphoto2 --capture-image --set-config capturetarget=1
# Written by: [email protected]
# Put the arguments sent by Octolapse into variables for easy use
SNAPSHOT_NUMBER=$1
DELAY_SECONDS=$2
DATA_DIRECTORY=$3
SNAPSHOT_DIRECTORY=$4
SNAPSHOT_FILENAME=$5
SNAPSHOT_FULL_PATH=$6

# trigger the camera and exit immediately
gphoto2 --auto-detect --trigger-capture

# Wait for 1 second, you may need to adjust this value.  You want the lowest possible value
# that gives you a stable timelapse.
sleep 1
That will cause the script to wait for 1 second before exiting, giving your camera time to take a snapshot. You will have to experiment to determine how long to sleep. You want to use the smallest possible value. For example, if you determine that one half of a second is adequate, you can change your script to sleep 0.5, or if one second isn't enough you could increase it to two seconds like this: sleep 2
We're almost done! Open OctoPrint and edit your current camera settings via the Octolapse tab.
First, we'll need to create a new profile.
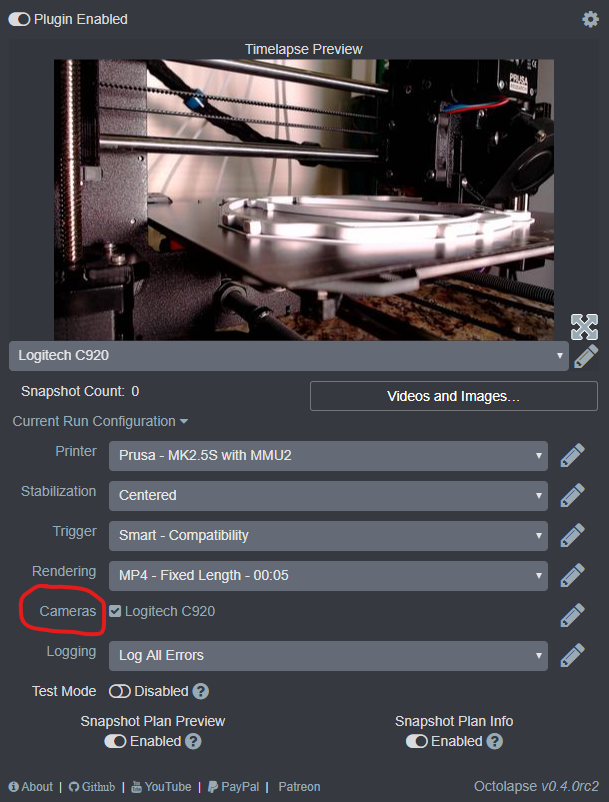
Open up OctoPrint in a browser window and click on the Octolapse tab. Make sure the Current Settings are expanded. If they are not visible, click on the Current Run Configuration link.
Then open up the camera profiles page within the Octolapse settings by clicking on the 'Cameras' link:

Next click on the Add Profile... button.

Name your profile so you can easily identify the camera. I'm going to use Nikon D5200 DSLR in this example:

Now, change the Camera Type dropdown box to External Camera - Script:

Next enter the following for 'Snapshot Acquire Script'
/home/pi/scripts/trigger-snapshot.sh
Here is what your Snapshot Acquire Script should look like:

Now, click the Test button next to the Snapshot Acquire Script:

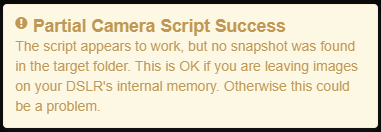
If everything worked, you will see this popup indicating success:

You will notice that the toast message is orange, which indicates a warning. The message will say that no snapshot was found in the target folder. This could indicate an error, but in this case it is exactly what we want!
If you get a failure message (will be in red), there was a problem. I will try to add some troubleshooting steps, but for now I recommend rechecking your script and testing GPhoto2.
Next, set the 'Snapshot Delay' to 0 since the script won't exit until the photo is taken and downloaded. It's a good idea to turn the snapshot timeout up to 10000 (10 seconds) while you are testing to make sure your camera has enough time to take and download the photo, especially at higher resolutions.

Now move to the Custom Camera Scripts section and set the Before Print Start Script to the following:
/home/pi/scripts/initialize-camera-save-to-sd.sh
Here is what you should have when you are finished:

Now click the Test botton next to the Before Print Start Script:
Warning: This will delete ALL images from your SD card, so be sure to back them all up!

If things went well, you should see this success message:

If you get a failure message (will be in red), there was a problem. I will try to add some troubleshooting steps, but for now I recommend rechecking your script and testing GPhoto2.
Make sure all of the other custom script fields are empty (Before Snapshot Script, After Snapshot Script, Before Render Script, After Render Script, After Print End Script).
Finally save your profile.

Optionally you can edit your rendering settings and uncheck the 'Timelapse Generation' option. This will prevent a rendering error message from showing up after your prints complete (no images found), but other than that there are no downsides to just skipping this step, except that you will see an error popup after rendering saying that not enough images were captured to generate a timelapse. The error is more of an irritation and not so much a real error. In the future I plan to add an option to the camera profile to skip the rendering process.
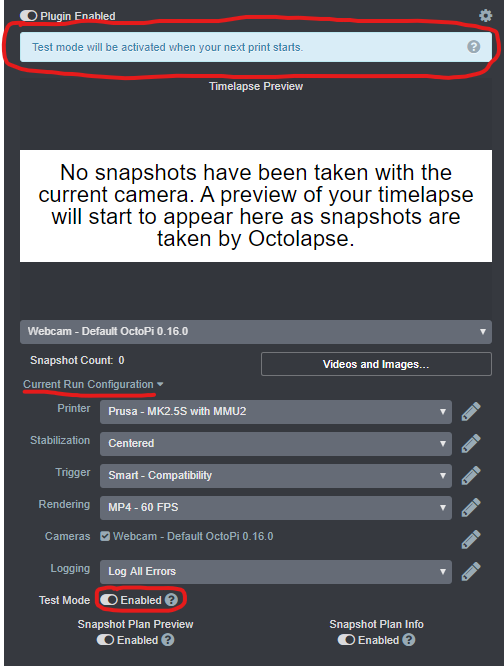
That should be it as far as configuration goes! Now run a short test print. Navigate to the Octolapse tab, expand the Current Run Configuration section, and enable the Test Mode slider at the bottom:

Test mode will prevent your printer from heating up (bed and extruder) and will strip off all extrusion commands, so you won't waste any time or plastic. I strongly recommend you unload your filament, though, just in case there is a bug or glitch in the test mode code, and make sure your bed/hotend stay cool.
Select a test file to print. I recommend something small and fast, so you don't have to wait long to make sure things are working correctly. Click Print once you have selected your file.
Octolapse should now run as usual. Since Test Mode is enabled, your bed and hotend should stay cool, no fans should turn on, and no plastic should be extruding. Octolapse will now acquire images from your DSLR, and any other cameras you have enabled. You should hear your camera snapping away during the snapshot phase. It should take substantially less time to acquire images now that the images aren't being downloaded.
When the test print is completed, check your DSLR to make sure the snapshots are located within the camera's SD card. Now you can download these images and render the images any way you like.
Congratulations, your DSLR is configured and ready to go!
Coming Soon
The instructions for this are coming soon!
Octolapse is provided without warranties of any kind. By installing Octolapse you agree to accept all liability for any damage caused directly or indirectly by Octolapse.
Use caution and never leave your printer unattended.
If you have a great new guide, see a typo, or have other suggestions for improving the existing documentation, please let me know! You can either submit a feature request or submit a pull request. I would appreciate it greatly!
Consider supporting Octolapse by becoming a Patron, a Github Sponsor, or by sending some coffee/beer money, I would REALLY appreciate it. Almost all of the donations go towards offsetting the cost of development, which are substantial. Plus it always makes my day!
If you cannot afford to leave a tip or just don't want to, that is fine too! Octolapse is free and open source after all. There are other ways you can help ensure that Octolapse continues to be updated and improved:
- Share your Octolapse videos, and be sure to leave a link and explain that the timelapses were captured with Octolapse and OctoPrint (you will be asked how you made the timelapse, so this will also save you some time answering questions). This is not necessary, but it is greatly appreciated.
- Subscribe to my youtube channel.
- Post any bugs you find to the Issues Page. I would like to eliminate as many bugs as possible!
- Participate in the OctoPrint Community Forums, and help all the noobs get OctoPrint and Octolapse working and help expand the hobby. The more people use OctoPrint and Octolapse, the better the software will become!
- If you've created a working and tested printer profile for any printers that aren't in the make/model list, please send it to me! I want to make it as easy as possible for new users to get their printers configured quickly.
- Help me make this documentation better! Octolapse has a LOT of documentation, guides, tips, etc., both here in the Wiki and integrated with the Octolapse plugin. If you find inaccuracies, typos, gaps, or have ideas for improvement, I'd love to hear about them.
- If you have any special talents that could be applied to Octolapse development, like graphic design, video production (think tutorials), programming, etc., maybe you'd like to participate more directly in Octolapse development/documentation?
